P38 conversion to “standard” 2 blade props… The plan.

As I think I mentioned in my last post, I really dislike the idea of having the 3 blade assembly on the Motion RC/Flightline RC P-38 being held together by the plastic back plate of the spinner and self tapping screws set into that plastic.  In order to eliminate this, I started looking at options.

I first thought I would simply purchase some one piece 3 blade props… but upon further study I realized that the spinners supplied with the kit were customer made and would not directly support such props.   Finding spinners that were appropriate would be possible but expensive and for all that expense I’d still have 3 blade props which are not my favorite from an efficiency perspective…  

My next thought was that perhaps I just purchase the 2 blade spinners and props from Motion RC that are provided as part of their sport power set?  The only issue is that the props are 12×8 two blade versus the 12×7 three blade set that is the standard set.  I want something approaching the same load and speed profile as the original if at all possible.  So the root question is what size and pitch prop in a 3 blade is most similar to the 12×7 stock 3 blade prop?

A bit of research revealed a loading factor can be calculated for any prop with the following formula:

PL=D*D*D*P*(square root(B-1) where PL=Prop Loading, D=diameter, P=pitch, and B=blade count.

Using this formula to calculate the loading factor of the stock props and then comparing to similar calculated factors for 2 blade options plus or minus an inch or two should give some propeller options that would be suitable.

In the course of measuring to see what options were possible due to ground clearance (I estimate anything up to a 14″ diameter would be reasonable) I found that the factory prop is actually about 6.25 inches in radius.  Based on that I adjusted to a 12.5 inch diameter for my reference point.

After loading in several prop sizes it became obvious that a 12×8 two blade was a far less appropriate match than a 13×8.  The 13×8 is less than a 1% load differential from the reference point while the 12×8 is 22% less load.  This means that the 12×8 propellers available from Motion RC just aren’t suitable for my purposes… not with the stock motors.  Based on past experience, it is highly likely that the difference between the stock prop and any other manufacturers similarly sized prop will vary by far more than this small percentage just due to blade shape and composition so, no guarantee but I think it will be close enough for my purposes.

This means I need both standard and reverse pitch 13×8 props and spinners.  Note that the spinners must be be cut to match the pitch direction so just 2 standard spinners won’t work here either.  Looking into all this, it appears the cost to get this all done is not exactly going to be cheap…  So maybe a flight or two with the 3 blades is in order to determine just how much I dislike this setup!  Maybe the plane will fly poorly enough that I won’t really want to spend the money…  🙂

Just as I was about to hit “publish” on this post I was assembling the propellers for both the green and silver aircraft when I had a problem that added yet another wrinkle…

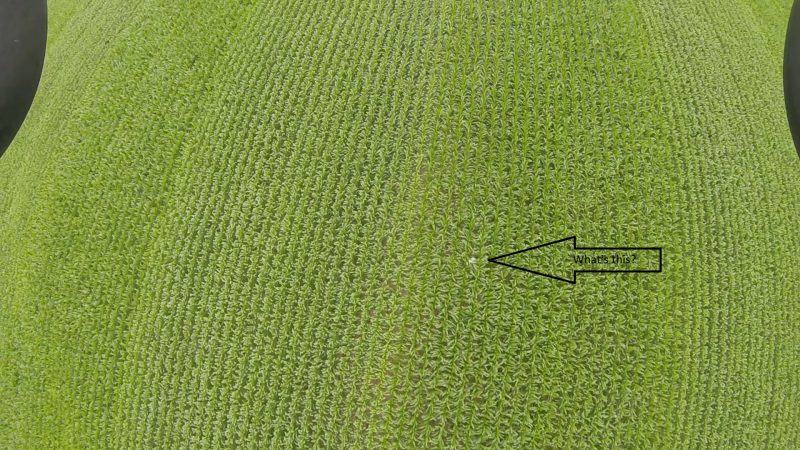
As I was putting in one of the final screws on the final propeller assembly (for my green bird) one of the screws sheared off before it even got tight against the prop!  Here’s a picture of the result:

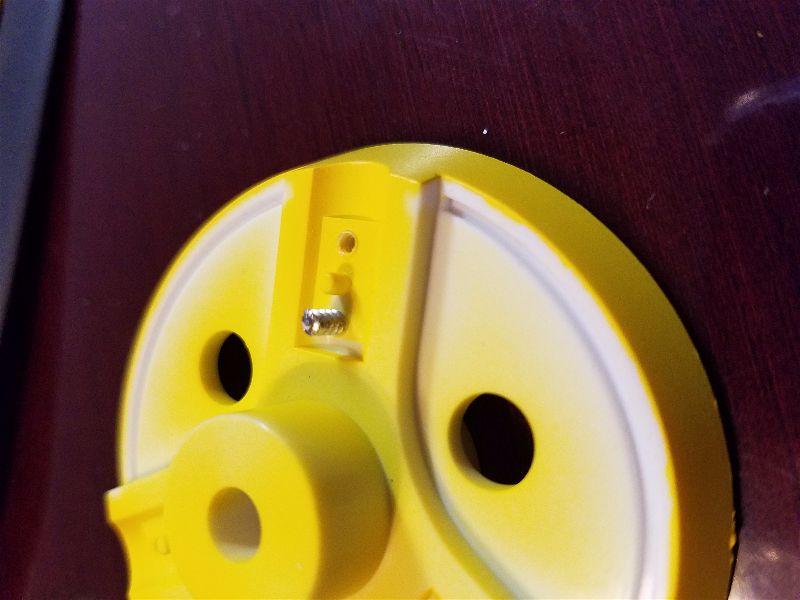
I’m a bit concerned, wondering if the other screws are all this weak?  Just when I was thinking maybe these assemblies would be OK…  This did not add to my comfort level.  I’m really in a quandary now as to which way to go.

The P-38s are here!!

As I got more involved with RC aircraft, I always wanted a twin engine aircraft… and in my book the only twin worth considering was the P-38 lightning.  I have always thought the P-38 was a gorgeous aircraft and I kept an eye out for a chance to purchase a nice example but there were a few issues with acquiring one.  Remember this was before the advent of high quality ARFs and certainly before low cost, high quality electric power systems became the norm so the only P-38s available were very large, very heavy gas powered craft with equally impressive price tags!  Smaller glow powered versions were few and far between partly because keeping two glow engines in sync has always been a challenge and I would assume partly due to the difficulty of designing an building an aircraft as structurally complicated as the Lightning.

For instance, designing and building a light and rigid boom assembly with the landing gear location limiting your options for structural integrity in the wheel well area would certainly be challenging.  And of course everything about the craft is round and tapered, making for additional challenges for the builder… especially if you wanted to create something close to the scale outline.  Lots of beautiful curves means difficult to form from Balsa, glue and covering.

Lucky for me, the days of stronger foam, carbon fiber reinforcement and inexpensive electric power systems is upon us!  Enter the Flightline RC P-38L available through Motion RC.  Since these first became available a few months ago, my buddy Kelly and I have both been watching the various on line forums for reports of both build quality and the air handling of this latest iteration of an RC version of the Lightning.  Reports seemed mostly positive so after he hinted for several months that we both should have one I recently texted Kelly with the phrase “I want the green one!”  It only took about 3 days after that before Kelly arrived at my shop with two fairly large boxes.  Here are a couple shots of the unboxing:

2016-11-10-17-18-03-opt

2016-11-10-17-21-47-opt 

And here is the workbench (all 12′ of it!) covered in P-38 parts!!!  Now that is a bunch of airplane parts….

2016-11-11-19-49-48-opt

At first impression I can say that these things are pretty impressive.  For $349, you are getting what seems to be a fairly strong airframe with two motors, two speed controllers, 9 servos, 3 bladed props, spinners, decals for 4 different aircraft, servo linkages, etc…  Basically it looks like EVERYTHING you need to fly except batteries and a receiver.  Yes, as widely reported, you can certainly see the foam cell structure through the paint.  This is especially true of the silver model as it has a higher gloss/luster to it.  Scale aficionados will doubtless be displeased but the overall lines are very nice and I am not trying to win any scale contests here so my initial impression is that they look pretty good.

I’ll post more as I get to assembling.  I’ve already ordered the upgraded landing struts (they seem like deal for $40 for the set!) and my receiver is on order as well.  I expect to be posting again soon as I don’t think I can stand to let these lay around here for very long.  Christmas just came a month or so early! 


Using my Hero 4 GoPro Session and the Carbon Cub to search for a downed RC Glider

Recently one of my flying buddies (George) lost one wing panel on his glider while sailing along over the cornfield adjacent to our field.  A couple of us who own multi-rotors with decent cameras were called upon to go on a little airplane hunting expedition.  Unfortunately, my only available batteries for the quad (a 350 QX) are a bit weak and I was concerned that with the expected distance to cover, I would have a hard time getting enough time over the search area to be effective.  Also, at that distance, the QX was going to look very small and I just don’t  have enough time flying it to be comfortable at that distance.  On the appointed day of the big search I arrived at the field and started planning some way to get out there and do a decent search.  Starting out at the very edge of the field or perhaps even staging in a bare spot somewhere further out were considered but in the end I decided to hold out a bit until my friend Martin arrived with his much more capable Yuneec Typhoon H.

In the meantime, I decided it might be fun to do a survey of the field with the Carbon Cub and GoPro Session.  I had a vague idea that if the aircraft was sitting high atop the corn stalks I might have a chance of getting a glimpse!  Even if we did see it in the video it seemed unlikely to do more than confirm a rudimentary vector to look on and perhaps a little more refined idea of how far off the field, but since it involved flying my cub… So shortly after I had the Session mounted and a fresh battery installed in the cub and away we go!

I angled the camera down 60 degrees or so and then started the video and took off over the corn.  I made three passes out and back along the line that the pilot reported his lost plane.  5 minutes later we fired up my laptop and started playing the video and carefully advancing a second or two at a time and looking on the video for anything that didn’t look like corn and especially anything white (which is the predominate color of the down airplane).

So here is a short clip of that flight… I highly recommend full screen for this one.

Did you spot it?  Here’s a single frame with a bit of help on what to look for.

AndHere

If you want to go back to the video around the 39 second mark you can probably pick it up for yourself now that you know what to look for.  Also notice that later in the video as I pass over the edge of the field you can get a line on where you would have to exit the field to find the downed craft!

In fact, after viewing the video a few times and following the row where we saw the plane out to the edge of the field and marking that spot as best we could… I walked out into the corn with one other person and we found it as soon as we got out far enough into the field.  In fact I walked to within 2 rows of corn on my first attempt and had no trouble finding it!

At this point I have no idea if we were just lucky or what.  It helps that the plane is mostly white… a military camo pattern would have been tough!!  I do know the video created by this camera is pretty amazingly detailed.  What your seeing here is very compressed version but even in this clip it is possible to spot that nice white spot in the corn!

For those who are interested, we were able to recover all but the one wing panel which we didn’t spend much time looking for after we realized the aircraft was pretty much destroyed in the wreck.  With what we had it what fairly obvious what happened that caused the wing to collapse.  After a stern talk with the ground crew (George mumbled to himself for a while) we were assured this particular error would not happen again!  🙂

The GoPro Hero 4 is an awesome little camera with all of the quality you expect from the folks at GoPro packed in a small little cube that can mount on a variety of RC planes in many ways.  It’s significantly lighter and smaller than the full size bodies with very similar quality video output.  It is NOT an FPV camera…  it is a great way to record the action and then view/edit and enjoy the awesome airborn views.  Here’s a link:

And if you need a great platform to carry it the carbon cub is hard to beat.  It can fly slow (almost walking speed with the flaps dropped) or move along briskly and carrying the camera has little to no affect on it’s flying characteristics.  Here’s a link for that as well.

The Carbon Z Cub isn’t perfect… it has some paint peeling issues, the main gear mount could be sturdier and the motor has been known to occasionally give up the ghost… I’ve documented all that in other posts here…  but I still recommend it because it just flys so darn well and it’s just a blast to fly.  Add in top notch support from Horizon and you have  pretty good airplane.

Anyway, it was fun and felt good to help a fellow flier get his airplane back.  Even staring at video of the corn passing underneath the plane was interesting.  Who doesn’t like a good video from an “elevated” perspective.  Hope your search patterns yield equally good results.  I’ll try to post some more soon on other interesting projects and happenings at the field.  Until then, happy 4th of July!  Or as we always called it at my house… “Happy dad’s birthday!”

JL Products RotoFlow – failure and replacement

A few years ago, I picked up a JL Products RotoFlow 24 ounce fuel tank.  I installed it first into my WildHare Slick 540 and the tank performed admirably but during an effort to lighten up that bird it was swapped out for one of the “water bottle” type tanks and the RotoFlow was transplanted into my (at that time new) Mustang where it has continued to work great.  Based on that success, a second RotoFlow tank was purchased and placed into my buddy Kelly’s 50cc P-40.

The P-40 is a beautiful bird but it has had its share of vibration induced problems (single cylinder gassers just vibrate more than most other engines) and during a recent repair session on that airplane we pulled the tank to get to the motor mounting bolts more easily and noticed something odd.  The clunk wasn’t rotating!  Holding it up to light showed something that looked a bit alarming….

2016-04-23 20.38.36-opt

It may be a bit hard to see here but that shadow should normally be straight if the tank is built according to this view from the JL Products web site…

rotoFlow

The good news is that after a quick email to these guys, a new tank was on it’s way.  They did not ask for the old tank back so we were able to slice into the tank and get a better look.

2016-04-27 18.55.48-opt

There are no loose solder joints… no obvious slippage of parts… and that outer case is thick, fairly rigid and very tough!  It was a bit mind bending (no pun intended) to understand how this brass tubing got in this shape.  At first we thought “The aircraft has not crashed and that tubing is pretty stiff!”  Based on this I had to assume this was a manufacturing defect.   Thinking back over the weeks since, we realized this tank was in the P40 that preceded this one and it did crash… hard… mostly on the nose!  That impact has to have been transmitted back to the nose of the tank and caused this bending… even though the outer part of the tank looked perfectly normal… I suspect there was a brief collapsing of the tank that caused this and then a spring back to shape that hid it!  It has been flown quite a bit since then without issue but probably not inverted for any time and never down past about half a tank so the clunk being stuck but still drawing fuel was good enough.

The folks at JL Products have gone above and beyond and sent an immediate replacement without question.  Not only without hassle but even with apologies.  Of course, at the time we thought it hadn’t been crashed so felt that this was excellent service and a fair deal.  Good customer service is not dead.  I’ll keep buying from the good folks at JL and the new tank is in place and the P40 good to go once again.

Carbon Z T-28 Recommended modification

As I may have previously mentioned, my flying buddy Kelly has one of the big E-Flite Carbon-Z T-28s.  He has trouble wiping the smile off his face when he’s doing one of his usual low speed, flaps down, no bounce, land like a butterfly with sore feet touchdowns.  With the AS3X keeping things even more stable on breezy days, this thing is just smoooooooooooooooth.

We initially had some nose gear issues (replaced) plus we added some Multiconnex and there was an issue with the flap hinge cracking (the flap/wing surface is the hinge) which was rectified with some Blenderm style wound tape/hinge tape.  As I recall, when we applied the tape we also replaced the wing control linkages.  Everything about them is undersized for this big aircraft and some folks have had small issues… others not so small.

So after an early spring flight recently, I guess we shouldn’t have been surprised when the rudder linkage lost it’s center pin.  Funny thing is we bought the additional parts way back then but never installed them.  It’s funny because it wasn’t the elevator that quit working!!  Kelly was able to get the airplane safely back on the ground and I have just finished manufacturing the replacements for both the rudder and elevator.

2016-04-30 18.07.39-opt

As you can see the original is just plain scrawny looking and our replacement is only 2-56 rod.  I consider even that small for this size plane but since they are so short (kudos for that E-Flite) 2-56 is sturdy enough I suppose.

The moral of the story however is if you are going to buy the big T-28, I would highly recommend you just go ahead and buy the hardware and replace all the flight linkages (6 short rods and your favorite clevises) before it even leaves the ground.  One less thing to worry about!

While you’re at it, order the Multiconnex (see that post here) and really make it easy on yourself!

Hangar 9 F4U-1D Corsair ARF build – The Evolution 77cc radial arrives!

Today my flying buddy Gary stopped by to give me a taste of his latest acquisition… the Hangar 9 F4U-1D 60cc ARF.  Gary has only been flying a couple years, but one plane has always caught his eye more than any other… the Vought F4U Corsair.  The distinctive WWII war bird is instantly recognizable to most and a favorite to many.

Gary stopped by today with just a few of the many parts and pieces required to get this big beautiful bird in the air.  First and foremost is the power plant.  Gary had the opportunity to see this engine at the Horizon booth when we attended and I think that pretty much sealed the deal.

The Evolution 77cc 7 cylinder glow 4 stroke is a piece of art.  It comes complete with a glow wiring harness and integrated mount.  But if you thought your wallet was done taking a beating when you bought the engine… probably not so much.  Most will want the collector ring (at additional cost of course) and an on board glow system as suggested in the engine manual (now that wallet can take a deserved short break).   Here are a couple shots from when we unpacked it today in my shop.

Here’s the money shot… This thing is just B-E-A-Utiful!

2016-04-09 14.48.13-opt

Even the mount is beautiful in an elegantly functional way.  Having the choke and throttle linkage thought out a bit for you is a nice touch as well.

2016-04-09 14.48.40-opt

There are some interesting little notes in the manual about oiling the push rods before each day of flying, adjusting valve lash when needed and inserting after run oil after every flying session by pulling a push rod and cam follower to add after run oil…  That all sounds pretty reasonable until you remember this thing will be hiding under a cowl, possibly with air baffling around the cylinders (again, a recommendation from Evolution) so maintenance is going to be a chore that no one with this kind of money invested is likely to be skipping I guess!  Ah, large fuel powered war birds…  They do enjoy being lovingly maintained!  What have you gotten yourself into Gary?  Of course it will all be worth it when we here the dulcimer tones that will be issuing from the exhaust!!  Oh, and watch out for hydro-locks in those bottom 2 cylinders!  I wonder if storage of the airplane “nose up” would minimize that possibility??

There are also some interesting recommendations on fuel mixes…  I don’t recall seeing 0% nitro with 10% oil on the shelf at the local hobby shop (for break in) nor 5/7 for later use…  Hmmm…  Better start looking for some pure methanol so we can mix up some custom fuel!!  This is where the modeling part comes in I guess.  I ‘m actually looking forward to seeing Gary in his “mad chemist” outfit with a bubbling cauldron… 🙂

All that aside, I really think it will be worth it all when that big bird lifts off.  This engine is going to demand some respect and loving attention for sure though.

Also in hand when Gary visited were his main retracts.  You have to admire the engineering behind these as well.  Not only are you raising and lowering the wheels whilst providing some nicely spring loaded struts… but they have to rotate 90 degrees as well!!  These are Robart units with the electric actuator so I expect smooth action and simple setup… at least for retracts!

2016-04-09 14.50.20-opt

We didn’t get around to plugging together a receiver and the control board so we could cycle these… I’m looking forward to that as well.

Gary promised pictures and some commentary as he gets started  building so I’ll try to post occasionally on how it is going.  Especially on anything interesting, troublesome or particularly cool.  We are already talking about ways to avoid the 2lbs of nose weight they claim we will need!  I hate lead in an airplane.

More as Gary progresses.

ElectroDynamics Multi-Connex… The answer for the Carbon-Z T-28 and many others.

After a few trips to the field with my buddy Kelly and his new Carbon Z T-28 we quickly became aware that assembly was a bit painful because of the number of servo wires that must be connected when attaching the wing and the shortness of the wires supplied in the T-28.  The length of the wires can be easily fixed but just connecting the 6 wires correctly and reliably time after time seemed an unnecessary annoyance to get to what the Carbon-Z does great… fly!

Another club member pointed out some multi-pin connectors often used in jets and after some quick searches we located the ElectroDynamics OneClik Multi-Connex.  Made for 2,3,4 and 5 servos connections these seemed to fit the bill so we placed an order.  Very shortly (even though we chose the most economical shipping method) we had two of these packs on the bench.

2015-09-24 19.15.43

Here’s the interior of the T-28 before we applied the OneClik solution.

2015-09-25 10.46.05

and likewise here is the wing root before the installation.2015-09-25 10.33.54

Here is the wing root after just sorting out the wires and plugging them in (in alphabetical order just for ease of remembering!) to the new One-Clik wiring harness.

2015-09-25 10.36.37

Similarly the interior of the fuselage (with a little wire combing to really clean things up as well).

2015-09-25 10.52.16

I applied a bit of combing to the wing wires as well and then with only two connectors to feed through the bottom of the fuselage it is suddenly very easy to assemble the T-28!  A  bit of Velcro (just a 1/4″ square of so on the connector and a small strip on the sidewalls) makes a nice “keeper” for the new connectors and completes the transformation!

2015-09-25 11.08.30

Admittedly, it helps that the T28 uses all “Y” connectors so there is no right or wrong for left or right sides so you can’t connect it wrong but for those that don’t… at least you’d only have to label right and left!!

The product has a nice snug fit, a great positive click connection and appears to be of a very high quality.  The pricing seems very reasonable and my only regret is that I didn’t order some of these for my Mustang!  Oh well, even with shipping these seem to be a bargain.

Since installing these, we have made a couple trips to the field and unlike previous trips, the setup time is less and we have not had a miss-connect (pretty much impossible now).  In the past this was a tedious task which has occasionally resulted in having to pull the wing and find an errant wire.  I think that is likely in the past.

This system will likely become one of my go to upgrades for all future multi-servo wing aircraft.  The ease of use and added security of the connection is a huge plus in my opinion and I highly recommend you give these a shot especially in those larger and more complicated craft like warbirds and the like with flaps, lights, and etc…

T28 Carbon Z… Not mine but I got to fly it!

A couple weeks ago I got a call from my flying buddy, Kelly.  It went something like this.

“If I were to buy this T28 Carbon Z… could you store it for me?  Oh, and would you have a battery or two for me to try?  Oh, and could you program my DX-8 to work with this thing?… Not that I’m necessarily going to buy it!”  Right….

Of course I said, “Yes, yes, yes… and bring it over tonight and we’ll get it setup”.  As you can guess, he did and we did!  Here’s what we’ve learned after approximately a dozen flights.

First of all, we took the airplane out with a completely stock setup and tried a few flights with a couple 6S 4000mah battery and while the plane flew nice… it ate batteries at a prodigious rate!  We were lucky to get a 6 minute flight and the batteries were down to dangerously low levels to even get that much.  Horizon recommends 3500-5000mah batteries and claims 8 minutes flight times for a 5000.  We have since found that the 8 minute flight time on a 5000mah is a reasonable estimate however I can’t imagine anyone being happy with a 3500 pack in the airplane so don’t waste time or money on the smaller packs… just go straight to the 5000s… or maybe slightly larger!  Kelly got a few flights today with some new 6S 5300 Glaciers and was much happier with the 7-8 minute flights with 30% or so left on the packs!

The plane flies extremely smoothly with great stability and recent forays into the flaps down/low speed arena kept Kelly smiling all afternoon…  Also, flying at slower speeds helps extend the flight times!  Win/Win!

photo

So here’s a few quick tweaks we’ve applied to this point.

First, since we always try to set up a throttle safety/kill switch, that became the first order of business.  In order to get things to work correctly, the throttle cut had to be set to a value of 30…  a bit odd but it works great!  If you leave the default value and power up the airplane with the throttle cut enabled you get a surprise when you turn it off.  The prop starts to turn slowly… sort of a nice low idle!  Since plugging in the battery with the throttle kill set to off/run mode sort of misses the whole point, I recommend you set the kill to 30!  Of course this may vary with other models or types of radios.

Next, we needed to reverse the gear channel to get the switch working the directly we wanted on this bird.  That may sound like just a personal choice but I mention it because it may seem a bit confusing if you’ve not been lucky enough to mess with electric retracts before.  Since electric retracts tend to just stop when meeting a heavy resistance, you may not realize which position the switch is in until you take the load off the gear and flip the switch back and forth a couple times.  Not a big deal but take the time to play with the gear a bit… and who could resist that anyway… to see how this works and make sure all is happening the way you expect.

Third, in order to maximize flight time without endangering the batteries, we installed a telemetry module and attached the voltage sensing lead to the speed control connection.  You can do this a couple ways.  There are harnesses available from Horizon you can insert in line between the battery and speed control or you can simply strip back a little insulation on the speed control wires and tack solder them in… just be sure to protect the exposed wiring when you are done so no unexpected sparking and smoke is likely to happen!  The telemetry module runs fine off of the included receiver, which is great.  We set the warning tone to kick in at 20.5V…  Under load this seems to equate to about 30% battery left when it starts to beep.  This gives you very reasonable amount of flight time left over to make that perfect approach.

So, up to now, the T28 Carbon Z seems to be a hit…. as long as you stay with a large pack!  My limited flight testing indicates it flies… well, like a T28!  I prefer the Carbon-Z Cub but the T28 is the best AS3X equipped plane I’ve flown.  I’d love to try it without to compare.  It doesn’t have the power to weight ratio that the Cub does,  but it can climb quickly on the wing and do nice scale maneuvers.  It also looks beautiful in the air.

It certainly seems Horizon may have another great aircraft in the lineup.  It may seem a bit pricey… but you get retracts, a nicely detailed cockpit and a great looking and flying aircraft for the price with no real deficiencies that I’ve found…  right out of the box.  That is what an ARF should be.


Cubs (and other slow flyers) Fly In at MCRCC… and a RC SAR mission at our field.

This last weekend found a group of us visiting  (once again) the guys at the Monroe County RC Club.  We made the hour trek to the MCRCC field arriving at about 9:30 AM.  By 10 we were flying a couple carbon cubs, a 1.20 4 stroke  powered “big yellow cub”, and one quad.  I personally got in 3 good flights on the Carbon Cub before the weather turned wet and very breezy.  Our last flights of the day (just after lunch) were a couple of glider tow flights.  During the last of these, Steve Howard piloting his KA-8 ran into some trouble as the headwinds that preceded the heavy rain showers forced an “off site” landing.  Other than that, we had a good time visiting the guys at Monroe County.  For $10, including lunch (which seemed to consist of hot dogs specially blackened on one side…. I must get the recipe 😉 ) it was a good time and the folks there were welcoming and friendly as always.  We are all looking forward to their fall float fly coming up this fall.

Steve took a walk in the corn to retrieve his glider and as you can see it came out unharmed… though Steve was a bit damper for the experience.

Hmmm….  He’s in here somewhere….

IMG_6011

Well at least the plane is coming out!


IMG_6014


Ah, it brought Steve out too… excellent!

IMG_6015

Martin Hooks did a couple flights with his camera equipped quad and provided this video overflight.  It’s an interesting perspective to watch the flights this way and see an aerial vantage point passing over the runway and surrounding areas.

Of special interest to those of us who might have had the experience of walking through the woods/cornfield/etc… looking for a down plane, take a look in the video at the views of the corn fields… you can see all the way to the ground between the stalks for quite some distance.  This works over beans, corn, trees, etc… to varying degrees and requires much less damage to the crops and far less trudging about!!

Earlier the same week we went out to our field and retrieved a Sport Cub (40″ +/- wingspan) from the bean field.  I had searched for an hour or so by standing on top of my explorer looking out over the beans… and even deploying field glasses but couldn’t get enough height to get food visibility.  With Martin’s quad, he was up for 30 seconds or less before we located the aircraft which was only 6 steps off the airfield!  I had been standing 20′ from it on top of my truck and it wasn’t visible!  Hint to airplane guys… make friends with the camera equipped quad guys… they can really rescue you!!  I know George, the owner of the plane, was very happy to get his aircraft back!!

Here’s a quick snapshot of Martin and his quad with the recovered cub.

2015-08-15 15.49.11

Club Fly In – Too much fun!

Saturday we had a little fly in at the field and while I don’t imagine we made much money for the club it was a lot of fun.  I don’t know what kept folks away.  Just a busy weekend I suppose, but I highly recommend this sort of laid back… just come out eat, fly and enjoy… type of event!

We had the good fortune to have some guys come down and visit with us from the Viehe RC Flyers in Lebanon, IN.  One of the gentleman, David Gulliver, brought along his big beautiful B25 “Lady Lil” built from Ziroli plans.  It spans 101″, weighes in around 34 lbs and is powered by a pair of Zenoah 26s as well as sporting electric powered retracts by Down and Locked.  David uses a Spektrum DX-18 for control.  Here’s some shots of this sweet bird.

Here’s a shot of the cockpit and nose art…

IMG_5725

And here is the crew getting it ready to go…

IMG_5731

And up she goes!

IMG_5806

She makes a pass… up close and personal!

IMG_5771

Banking in for a strafing run??

IMG_5757

A photo pass for the crowd…

IMG_5746

We all enjoyed the visit from David and his buddies from the Lebanon area.

Though I don’t think we had any aircraft to match this big beautiful bird… we had lots of fun as well.  At a couple times during the day we got out the Limbo poles and the stick and cup to try our hands at some Fun Fly events…

Here’s Steve with a nice stick break… as you an see his earlier limbo pass was not quite as successful!

DSC_3152

(photo courtesy of Steve Kessler)

Here’s my stick break, a limbo and my spot landing (using the stick holder as a target) with what has quickly become my go to airplane… The Carbon Z Cub… without AS3X of course!

DSC_3189

(photo courtesy of Steve Kessler)

DSC_3190

(photo courtesy of Steve Kessler)

DSC_3203

(photo courtesy of Steve Kessler)

DSC_3207

(photo courtesy of Steve Kessler)

Still our “new guy” at the field… Gary Miller took up his Corsair.  This may be his most successful landing with it do date!  (… that’s nothing I wouldn’t say to his face…)

IMG_5902IMG_5903

IMG_5904IMG_5905

IMG_5906

Of course he is already plotting the repair and return to the sky!

IMG_5909

There were lots of other airplanes up during the day… this P-51 had an on board sound system that mimics engine startup and level flight as well as machine gun sounds!

IMG_5918 IMG_5943

Dusty the crop duster was spotted over the field!!

IMG_5990

This cool toolbox made an appearance…  Yes, the owner had a P-40 but it didn’t make it to the field this trip!

IMG_5972

Vern gets a visitor up no the buddy box for a no stress first flight.

IMG_5920

I don’t think much of the trainer’s chances if the Mustang on his six decides to take him out!!

IMG_5934

As I hope you’ve gathered by now… be had a great time and the weather couldn’t be much better for early August in Indiana!  A light breeze, 85 degress and sunny with just a bit of humidity.

More fun than humans should be allowed to have.  Did I mention the burgers, dogs, baked beans, chips, pop… etc…  I hope we will continue to have events like these and we can find a way to make a bit of money from it in the future.  This is what an RC club should be about.