
Hitec X4 Micro AC/DC 1 cell LiPo charger
I have taken to doing some indoor flying over the past couple of winter seasons as the bitter cold and snow of Indiana this time of year is not particularly conducive to just hanging out at the field. It’s a lot of fun, but is yet another specialized endeavor within RC which means there is some specialized gear available to help you get the most out of your time spent. I.E. More toys!!
For instance, most of the small indoor aircraft use a single cell LiPo in the 30-200mah range and tend to eat up those precious little milli-amps in a short 4-8 minute flight. That means over the course of a 3 hour indoor session you can run down a BUNCH of batteries. I tend to take some pictures, talk with the other pilots about their aircraft and find other ways to distract myself for much of the time but I can still run short of charged batteries in a hurry. This is especially true when flying a little quad that can use up a battery in 4 minutes. Along with buying ever more batteries, I’m doing a fair amount of recharging at the gym.
At first, just using the single chargers that come with many of these airplanes was OK, but those chargers can be slow, are sometimes bulky and they either have to plug-in to an AC outlet or run off AA batteries depending on the whim of the manufacturer. It’s easy to end up with nearly dead AAs inside those chargers at the worst time and there is never enough space on my 2 wheel cart going in and out of the gym so my array of 4 single cell chargers (powered by 16 rechargable AAs) had to go!
At first my solution was simple. I have a couple of buddies who each have one of the Thunder Power Quad Port AC/DC chargers. I would just borrow a charge port or two from my flying buddies!! This works alright and they don’t mind sharing (not much anyway) but there were never enough charge slots available and I was hoping for something a bit better. I tried to drop hints that those guys needed to upgrade their chargers but I’m the gadget guy of the bunch… I like buttons and switches (if they serve a purpose) and they were happy with the simplistic but effective little Thunder Power. Here is the little TP with a link to see it on Amazon.

Thunder Power Quad Port Charger
After a little research on the web, I decided to pick up the Hitec X4 Micro. At a bit over $50 it’s a bit more expensive than the TP but it has several nice features.
![hrcp4212[1]](http://flyrc.info/wp-content/uploads/2014/12/hrcp42121.jpg)
X4 Micro AC/DC 1C LiPo Charger <- Click here to see/purchase this on Amazon
The Hitec can not only charge 4 batteries simultaneously at anything from .1 to 1 A rates, but it has a separate LED display for each of the four charge circuits so you can tell what is going on with all 4 with a glance. To charge just plug in to any of the 4 sockets as appropriate for your battery connector type, dial up the rate you’d like to charge and push down and hold the red start/stop button for a few seconds (until the led lights solid and you hear a longer beep) and you are charging. If you just momentarily tap the button before charging you will be shown the current cell voltage (and hear a short beep). During charging the display sequences through showing you the current charge rate, the current cell voltage and the amount of charge taken (in ma). When the charge is complete you are treated to a green light along with a series of 5 beeps and the word FULL on the screen. This alone may be worth the price of admission for some. One of my flying buddies is effectively red/green color blind so you can imagine that seeing FULL displayed might be more helpful for him than just a red or green LED. With FULL displayed you can tap the button again and get a cycling display showing the end voltage, the total milliamps provided to the battery during the charge cycle and the FULL display. With AC or DC input options, along with an AC cord and DC connection with alligator clips all supplied, this little charger is at home and ready to work on the bench or at the gym.
While the Thunder Power is a fine little charger (and it is much smaller than the Hitec which can be an important plot point) it can’t compete in my mind because of what for me are the two big pluses afforded by the Hitec. First is the array of information available to me when using the Hitec. The TP just tells me charged or not via the red/green LED. The Hitec keeps me informed from start to finish. Secondly is the ability to control the charge rate. This is handy in both protecting my batteries from being “beat up” by a to high charge rate and to take advantage of faster charge rates when I want to based on the capability of the battery under charge. Most of the little 1 cell chargers do so at a fixed rate… in the case of the TP for instance .3A… period. Want to charge your 30mah cell? Hope it likes to charge at 10C cause that is what it is going to get. Fast but brutal!! How about your 200mah? You guessed it, .3A and I hope you aren’t in a big hurry cause it’s going to take 40 minutes or so. Don’t get me wrong, chargers like the TP are fairly inexpensive (Around $35 at the moment) and work pretty well for most applications, but I like to have more control over the charge process and know a little more about what is taking place. With the Hitec I can charge my 150mah E-Flite at it’s max charge rate of 3C (450ma) for a quick 20 minute charge when I really want to get back in the air fast but when the session is over and I’m back on the bench getting things ready for the next fly, I can just as easily drop down to a leisurely 150ma 1 hour charge.
I will say that the Hitec does require you understand a bit more of what you are doing in order to be used correctly. You have to pay attention and set the charge current accurately to get maximum benefit from the box (easy to do with the display and just a little knowledge). In my book that’s just another part of the hobby and one I enjoy actually so this is my kind of tool and for $50 I think the price is reasonable.
The other price you pay for the extra features of the Hitec is a little bit of bulk. The Hitec is pretty compact for what it can do (especially for an AC or DC unit) but your not going to stick it in your shirt pocket either. Still compared to the single cell units I was using this will take up the same space as one, and do the work of 4 so all in all I expect this thing is going to work out well for the intended job. I’ll update as I get more experience if anything changes my mind but at the moment I’m thinking the Hitec X4 Micro is a keeper.
E-Flite Carbon Z Cub – First flight and glider tow!
After waiting for the warmest temps of the day to arrive (while watching my favorite NFL team squeak out another win) I and my buddy Steve headed to the field to get a first flight on the Carbon Z. We had about an hour of daylight left with temps in the mid 40s and a mild 5-10mph wind mostly down the runway to work with when we got to the flying field. For early winter in these parts, about as good as it gets.
Assembling the cub in the cool weather was a bit chilling but not overly difficult or time consuming. If you have to have struts, these aren’t to bad to put in place. First order of business was to make a short hop to check trim and dynamic balance and overall just get a feel for how the Carbon Z would fly. The result? Pretty much as expected. The big Cub found the sky very quickly before I had gotten much past 1/3rd throttle! Subsequent takeoffs were found to be possible in about 4 feet… and that is without use of the flaps.
With only a couple clicks of trim, the cub flew nicely. Using the wing and somewhat less control throw than recommend even for “low” settings in the manual, the cub was immediately discovered to be more capable than any cub I’ve ever flown or even seen flown. Power was adequate for nearly unlimited 90 degree vertical climbs, continuous knife edge, 20 foot diameter loops, rolls, stall turns, etc… No problem. After 3 minutes or so, a nice, gentle main wheels only landing was accomplished. We quickly then rigged up my friends brand new KA-8 glider and with a very smooth mid-power climb he was hauled up to about 250 feet where he successfully released and began floating around the field. The cub was brought in for a quick landing so I could watch Steve’s KA-8 floating about and then making a near perfect “spoilers” landing within 20′ of where we stood. Nice job on the first flight Steve!
After clearing the tow line and moving the glider away, Steve took the Cub up for a quick spin and commented immediately on the ample power and stability of the Carbon Z. After a few minutes of fun, Steve brought the big bird down for nice landing of his own.
Before the light could totally fail, I took the bird up for one more flight. First, I climbed up to a safe altitude and tried deploying the flaps. The resultant pitch up was fairly dramatic, and that was with the lesser of two flap settings I had programmed. That will require some more research and programming! Pushing the envelope a bit further I started through the basic IMAC sequence as best I could recall from earlier this year. The Cub seemed to be doing fine with the maneuvers until the motor started to pulse and it was time to come in for another easy landing. Altogether, I had been above 10% throttle for about 13 minutes. Better than I expected for the 3300mah pack, especially in cool weather.
Even though the Cub landed very gently, I do want to get some softer wheels for those times when something slightly more harsh occurs and the flap mix and travel are going to require some more adjustment and testing. As well, I will be getting some more batteries of somewhat varying size and brand. I think the cub could easily handle somewhat larger cells and I wouldn’t mind to have a bit more flight time per pack. With a safety margin, the 3300s would appear to give me a solid 10 minutes of more aggressive or maybe 12 of pure cruising. I’m guessing this might translate to only 2 or 3 glider tow climbs and in this mode I really would like to have to stretch that to 4 or 5. Once I have some more batteries in hand I can do some test flights and see what sort of trade off between capacity and weight is possible.
Overall, after one battery (3 short flights) I can already tell the big cub is going to be a lot of fun. I’m looking forward to getting her out at the next club event (the Freeze Fly on January 1st). With these bug tundra style tires, even a little snow shouldn’t present a problem. And if the snow gets deep… the floats are sitting in the box out in the shop.
E-Flite Carbon-Z Cub… Modifications and Setup
With cold weather and rain the rule for the first few days after the initial assembly of the CZ Cub I turned to setting up my radio and adding one or two “upgrades”.
First up, I went through and put triple rate control throws and levels of expo on my radio. Also I set up for a stopwatch timer as I am unsure of the flight times I can get from the recommended Eflite 30C 5S 3200mah battery I purchased. From there I setup the flap system with a nice slow 2 second deployment and 20 percent of down elevator throw. Unfortunately with no indication of how much Flap throw is considered normal there is no way to know how much flap or how much elevator mix will be required to offset it. The manual says 42% of elevator but that is hardly helpful with no idea of 42% of what!
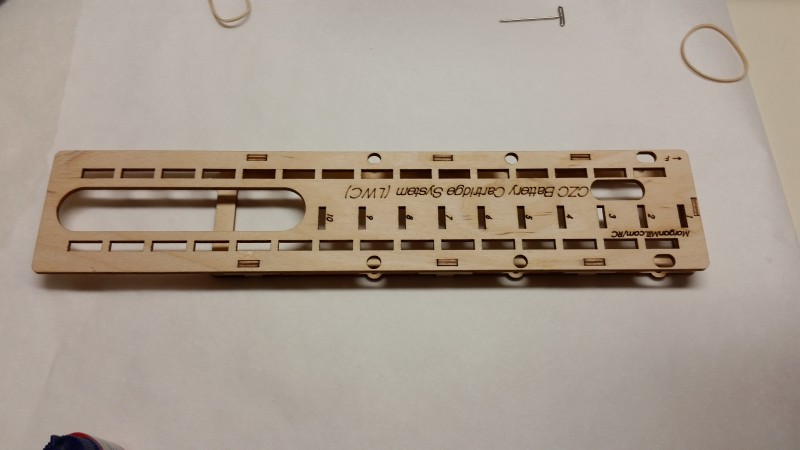
Continuing on, I had read some forums that indicated that the paint around the front hatch was prone to damage due to trying to get hands and batteries in and out and that a new battery tray that was laser cut helped with this issue. I decided that this made some sense so I ordered the Morgan Mills RC battery cartridge system and installed it. Assembly was easy once I viewed the assembly video on line about 3 times! If you don’t do that, good luck as there are NO included instructions!! The tray and cartridge seem very nice so far and definitely make getting batteries in and out easier. This is the part that replaces the plastic tray inside the airplane.
And this is the battery holder that you put the battery in before insertion into the airplane. I added the small rubber dots you see to keep the pack from sliding even the small bit that is allowed by the tray. I also used my own double sided industrial strength Velcro instead of the stuff that came in the airplane (it seems a bit weak when you consider how heavy the battery is that your securing).
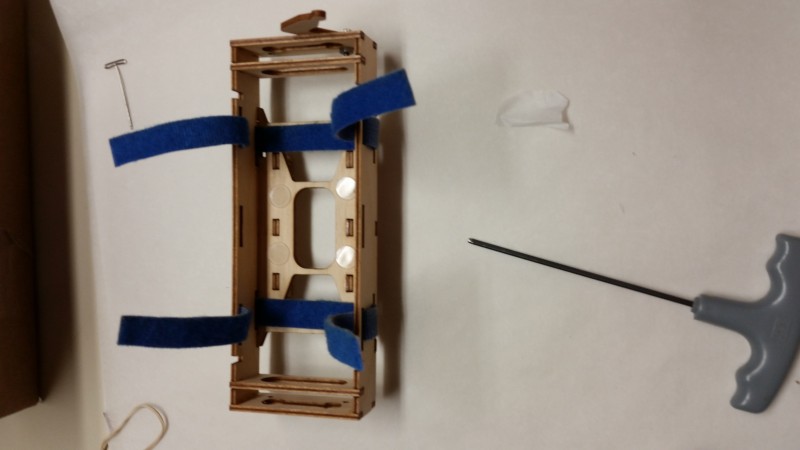
So far, playing on the bench, it seems to work very nicely and the ability to easily reposition a battery to exactly the same spot every time you put it in the plane is certainly going to help, especially if you plan on running more than one size/weight pack (like I likely will).
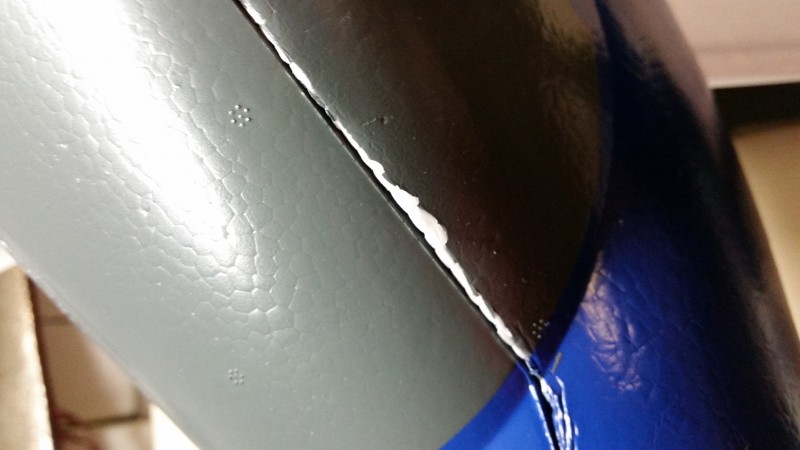
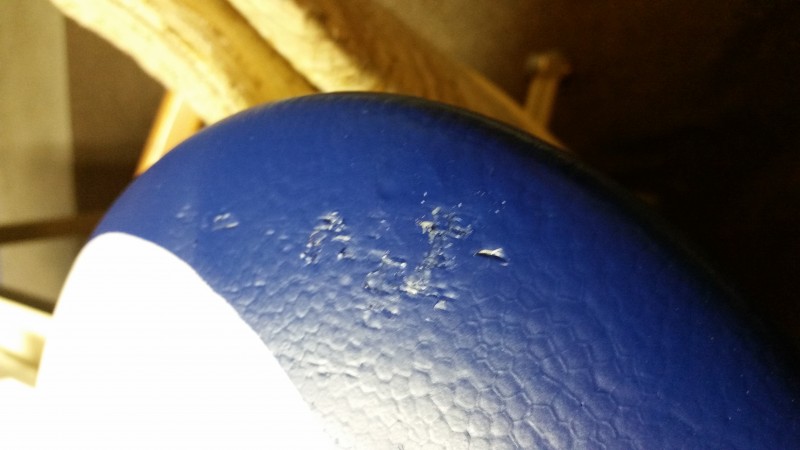
The downside of all this is that folks are right on when they say the paint in this area is fragile. In fact, I think it is pitiful… Even being aware of the issue and trying to take great care, I have already lost a fair amount of paint in this area before I’ve even made my first flight. This is very disappointing… I realize this is a foamie but it’s a fairly expensive foamie (not the original cost so much as the total investment) and there’s got to be a better way to get the paint to stick to this foam. It really worries me as to how well the rest of the paint is going to hold up. My investment at this point with battery, receiver, plane, floats, and glider release servos is over $600. I’d like to have this thing look decent for more than the first 2 weeks! I was thinking the overall price on the CZ Cub was pretty nice for this large a plane… foam or not… but I was expecting to keep the paint attached for more than a few days. Very disappointing even if it is only cosmetic. Here is a close up shot showing what has already occurred in just a few days.
Next I went to install the glider tow release servo. I love that the CZ Cub has this built in with only a servo needed to make it operational. I have two buddies who would love to have a good tow ship available to get their gliders aloft and this thing could be just the ticket! I wish the instructions were a bit clearer… or maybe just a better diagram but the actual mounting point looks a bit different than the diagram with no direction given as to what type of screw to use to mount the servo… at least E-Flite is consistent! In actual practice I ended up using one screw through the servo mounting hole on the servo and another just overlaps the end of the servo mounting tab and clamps it in place. It seems very strange but seems to work so far.
At this point I am ready to fly and while I am trying to tamp down my expectations I really am expecting some good performance. The plane only weighs 8.5lbs ready to fly at this point and with the 6S power, flaps and huge wing area it should be a real floater with some excellent power to weight ratio. Can’t wait to fly!
E-Flite Carbon-Z Cub… Unpacking and Assembly
I recently purchased a new Carbon-Z Cub, produced by E-Flight and distributed by Horizon Hobby.
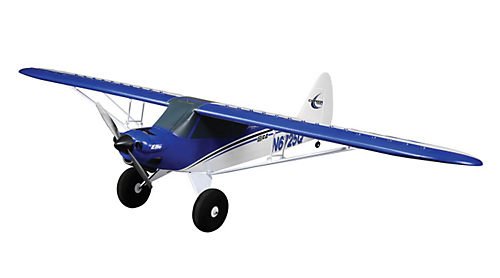
Carbon Z Cub
<– Click here for purchasing options via Amazon
After some research, I bought the PNP version because I really didn’t want the AS3X in a plane of this size. I’m a big fan of that technology in the small planes where it can aid immensely. I’ve owned a couple with AS3X and these planes fly well in windy conditions that would completely overwhelm me (and I think most pilots) without it. There are lots of other reasons I went this way (in spite of a very low delta in price) but the two main reasons are that I don’t like the receiver essentially limiting what I can do with my radio (things like end point adjustments, rates and exponential) and maybe most importantly an 84″, 8.5lb Cub probably just doesn’t need it!
So back to the beginning… I got the cub home and started to unpack it. Firstly, it seemed to be very well packed as you can see below…

with only one really noticeable case of shipping rash and no real damage. Here’s the worst of it… the right wingtip.
It’ll probably get worse than this soon… but I can’t help wishing it had come out entirely pristine! Oh well, it’s probably to much to ask that an airplane made of the same materials that it is packed in is going to come out of the box perfect. Actually this is pretty minor compared to the rash many planes come out of the box with.
After laying it all out on a large table (the plane is big). I started assembly and immediately ran into two of the issues that I have heard mentioned before. First, the included wheels are made of some sort of very dense foam and while lite… are very, very hard. It is an effort to even dent them by gripping them and trying to crush them by hand. Combined with the landing gear mounting in foam and hard plastic and this leads to a concern about how well the landing gear will hold up in the long run, especially whether the foam will crush or the plastic crack under the stress. The wheels sure aren’t going to cushion anything! I’ll have to consider finding some wheels with a bit more bounce.
Next there was an issue trying to find the right screws to mount the gear and this issue continued throughout the assembly of this ARF. This has apparently been an issue since day one and even the addition of single sheet “fastener guide” didn’t do enough (at least for me) to sort out the issue. It’s kind of funny when you realize that this has been overcome quite effectively by many ARF manufacturers in the past using a variety of methods but somehow E-Flite couldn’t figure out a simple way to label the various parts and call them out for easy identification. Adding to the confusion is the fact that extra hardware is included in the kit… normally a very good thing, but in this case… adding to the confusion. Eventually I figured it all out… I think.
As the assembly progressed I ran into another issue where the instructions could have been improved. Keeping in mind that you are working with a largely foam and plastic (and very large) airplane, it might be nice to mention just how tightly some of these fasteners should be. For instance, in a later step you attach the wing with a couple of bolts but if you tighten these down to much… foam starts to crush. It doesn’t take as much force as you might think, so be cautious not to over tighten!! It IS a big plane, but it’s still a foamie!
One more assembly item came up when I was mounting the motor. There is a lot of wire between the motor and the speed controller and no mention of what to do with it all in the instructions. This is important because the motor is an outrunner and you do NOT want the wires to abrade against the motor casing. I did not like the idea of stuffing the wires back around what might become a rather hot speed control… hot metal and wires don’t mix, nor did I want to block airflow. So, I wrapped the wires inside the cowl and secured them with some clear silicone calk… Here is what that looks like…
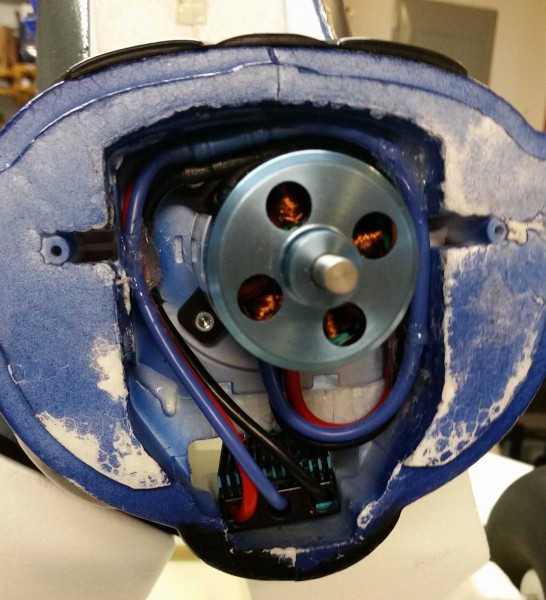
Hopefully this works out well. I’ll try to keep an eye on them.
In spite of all of the above, it only took around 2 hours to complete assembly of the big Cub and depending on how the landing gear survives, it looks like the result is a fairly well built and finished airplane. I’m really looking forward to getting a warm day to see how it flies! This is by far the largest electric I’ve ever owned and I’m looking forward to trying to trade some “electrons for altitude”!
One final assembly and initial setup note… I was surprised to see that no actual control deflection measurement are specified in the manual! To me this is clearly unacceptable. I realize that for those who purchase the BNF version, these are not needed and I’m happy to see what appears to be fairly complete instructions for those folks but what model does NOT specify control throws?? Usually for at least two “rates”.
All in all, so far I have mixed feelings about the Carbon-Z Cub. At first, it seems like a fairly big investment for a foamie and there are a couple of small assembly issues, but… It does seem to be fairly well built and with this size wing, the option for glider tow, floats, full flaps and the chance to break into a truly large electric… I think the value is pretty good. Of course flying is the real goal so I’ll withhold judgement for a bit longer.
Right now I’m fairly happy with what I’m seeing and I’m looking forward to see how it performs in the air.
First flight on a Parkzone UMX B-17G
Saturday night at our local indoor fly I had the opportunity to fly the new Parkzone UMX B-17G. Here are the specs from the Horizon website:
Wingspan: 26.0 in (660mm)
Overall Length: 18.3 in (465mm)
Wing Area: 87.5 sq in (5.65 sq dm)
Flying Weight: 2.75 oz (78 g)
Motor Size: 6mm in runner (Left and RIght Rotation)
Radio: 4+ channel DSM2/DSMX transmitter required
CG (center of gravity): 38mm back from leading edge at wing root
Prop Size: 72×65 3 Blade
Speed Control : Brushed ESC (included)
Recommended Battery: 3.7V 1S 250mAh 20C LiPo Battery
Scale: 1/48th Scale
Experience Level: Intermediate
Is Assembly Required: No

Parkzone UMX B-17 <– Click here to view purchasing options on Amazon
The first thing you need to be aware of is that there is no steering on the tail-wheel so you need to get some forward speed quickly so that the rudder becomes effective and you can turn! Not a big issue as doing a ROG takeoff was accomplished fairly rapidly and without any real need for rudder input. The counter-rotating motors and three blade props seem to provide good power without causing any yaw that I noticed. I was flying in a gym that consists of 3 side by side basketball courts and was off the ground in about 10 feet. The B17 flies fairly slowly though I would rate it moderately fast for an indoor venue of this size. I had to apply a fair amount of down trim to keep it from nosing up but I suspect the battery could be moved a bit more forward to offset some of that. Probably 15 clicks of trim before I got level but this was not my radio so I don’t really know what the trim steps were set for (it was a DX9 I believe).
I’m fairly sure no expo or rates had been set, just a very vanilla setup. In spite of this the B-17 flew smoothly with a fairly wide speed envelope. Roll and Yaw seemed to be adequate though I did not try to do a full aileron roll, stall turns or any thing of the sort considering it was not my airplane nor did I have much room to work with. All I can really say is that it flew smoothly and turns were easily accomplished though a bit of rudder coordination seemed to make for much better turns. In a gymnasium you quickly learn to turn while maintaining altitude or you will be bouncing off the floor or dodging rafters on a frequent basis. With the help of the AS3X system, this was not very difficult. The only concern is on landing as the B-17 does what all my AS3X ships do… it wants to keep level and will attempt to do so by applying more and more elevator as you back off on throttle until the plane stalls abruptly!! This can be a bit disconcerting the first time you experience it so my advice is bring the B-17 in a bit hot to stop this from happening until you learn the stall speed of the plane at altitude. A few clicks of throttle will keep this at bay until you learn the characteristics of the plane. This seems to be an AS3X thing, not exclusive to the B-17.
All in all, the plane flies much better than such a small multi-engine like this really should! And it is really impressive how much scale detail they pack into such a small package. Flying it isn’t difficult, the intermediate rating they apply seems appropriate. I’d love to fly one outdoors to see what it can really do… I’m going to guess that basic aerobatics (more than a B-17 should be doing) are within its grasp and flying smooth and looking impressive it can certainly pull off. Wind handling will be interesting but based on other AS3X craft I’ve tried I expect a 5-10 at most would be within reason with a little practice.
It’s hard to believe that all 4 engines running at around half throttle didn’t kill the battery after 8 minutes of flight. I thought I could detect it slowing a bit at that point but it was still flying when I landed it with only a minor bump into the wall as the roll out lasted a bit longer than expected! No damage, so NO, I don’t own one yet! I do encourage you to get one though… and then let me know when you’d like me to come over and fly it for you a bit!
Blade Nano QX – Radio configuration
I’ve had the Nano for a few days now… maybe a dozen flights and I’m enjoying it very much. Straight out of the box and with the radio configured per the instructions (Using my DX18) it is a nice flying aircraft. However… there’s always room for improvement, right?
So here is what I’ve done to program my DX18 to help the little quad fly even better. Here’s my list of “wants” that I came up with:
- First of all, I wanted a throttle cut. I consider throttle cut to be a necessary safety feature on any aircraft and on electrics especially.
- Obviously I need a timer. The flashing light on the Nano that signals a low battery has so far been unnoticeable for me.
- Finally, I wanted to institute Expo and End Point adjustments in concert with the change from Stability mode and Agility mode.
With that in mind I started to do some programming on my DX18. As I thought about what I needed, it hit me that what I really wanted was to use “flight modes”. With the FM feature, a single switch or combination of switches can change multiple settings including end points, dual rates, expo settings and more. I have never had a real need for FM, though in some cases it might be equivalent to or better than what I do now, but this seemed the perfect fit. I wouldn’t want to enter the agility mode without also dropping my rates down and adding some expo and doing that all on one switch seemed ideal. I knew there was some reason I bought this expensive radio!
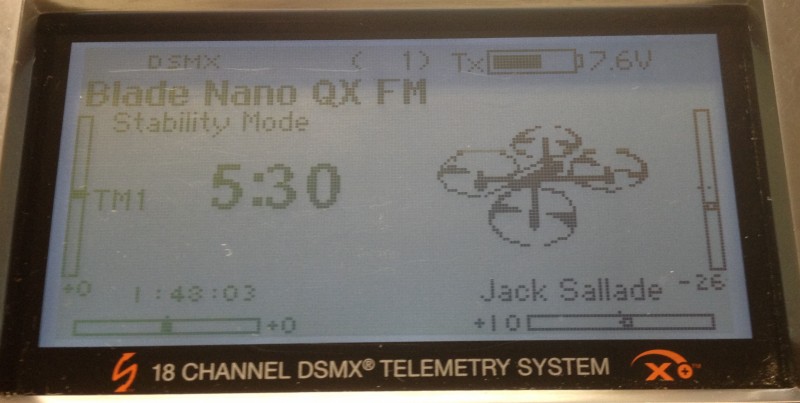
The throttle cut function was easily added as was a timer… very standard and easy to do stuff. But the next part got a bit more difficult. The mode change (Stability or Agility) on the Nano is set to operate off of a temporary switch… in this case button “I” which is often used as the trainer switch on most radios. I now wanted this to move to one of the 3 position toggles so that it would happen in concert with my flight mode changes. It isn’t difficult to reassign this function (in this cast AUX1/channel 6) but when I did that I quickly realized that this was not going to work as intended. I had thought I would have 3 flight modes. FM1 would be stability mode with full throws and a little Expo (maybe 30%) thrown in to help me be smoother on the controls. FM2 would be agile mode with moderate throws and a similar amount of Expo with FM3 being “crazy 3D guy” mode with full tilt throws and a much greater expo setting (maybe 70%) in order to keep things from being to touchy. Not sure I’ll ever need that mode and maybe I’ll switch this around later to 2 Stability modes and only 1 Agile mode option but this is my desired starting point. After adding in the “Quad” graphic the main screen shows the modes as seen here.
Here’s FM1 – Named Stability Mode
And FM2 – Agility Mode I
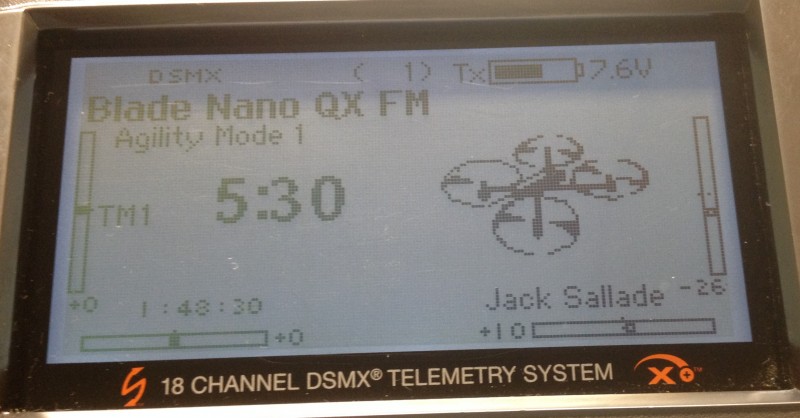
And finally FM3 – Agility Mode 2

That all looks good but after moving the AUX1 channel to a three way toggle, a quick on-bench test immediately brought a problem to light. The Nano wants to see a temporary Off-On-Off type of signal to change from Stability to Agile and vice versa. Just going Off-On didn’t do anything until you came back to Off. Imagine toggling the switch from 0 to 1 (no change in Stability mode but more throws) or moving on to 2 with lots of throw and expo but still in Stability mode… no big issue yet. But, then going back to 0 and suddenly you’re in Agility mode but with full throws and low Expo… yikes! For a bit I thought I was stuck… but then the DX18 came to the rescue.
The DX18 has something called a sequencer. With the flip of single switch you can have a series of events occur. In this case I setup the sequencer so that going from 0 to 1 (or 1 to 0) caused the Aux1 channel to move to full (step 1) and then back to start (step 2) with a delay of about a half second in each direction. This sent the correct sequence of events just like hitting a temporary switch. Moving from position 1 to 2 does not have an associated sequence as I’m already in Agile mode after I move from 0 to 1. Nifty! The only catch here is that you have to start with the switch in the correct position. That’s not a big problem as I have a habit of having all switches pushed away from me when I power up my radio. I found a way to help with that issue as well though. More on that a bit later.
With that solved (it’s easy to test for this on the bench as the Nano changes its LED from blue to red when you enter Agility mode) I moved on to setting up my throws (End Points and Dual Rates) as well as my Expo settings for each mode. With that all accomplished I did a quick trial flight and so far everything is working as planned. Of course nothing is perfect and I started thinking that I really wanted to insure I powered up the radio in flight mode 1 and with the throttle cut engaged.
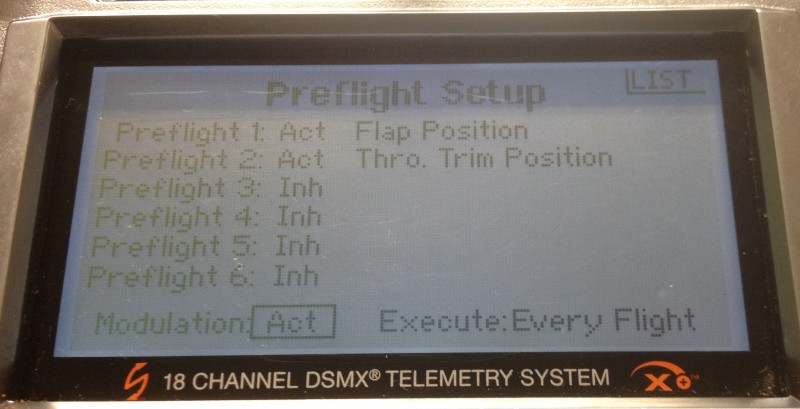
This got me to looking at another underutilized (at least by me) feature of my DX18 and that is the preflight checklist. I immediately found this feature to be quite simple to use. I have to say I sure wish I could edit the checklist descriptions, but I found two that are close enough that reading them will get me to thinking about these two important switch settings. My Mode Switch is using a switch that I often use for flaps on other aircraft so the “Flap Position” checklist item works for that and the “Thro. Trim Position” gets me thinking about throttle enough to remind me to check the throttle cut switch. Of course these check box items don’t actually check the position of those switches for you, but you can (and I did) set the radio so that it will not start sending RF until I check the boxes, and you have to do it before each flight (assuming you turned off the radio or went to another model memory in between). At least it gives me one more chance to get it right before taking control of the Nano! Here is the setup screen for that feature.
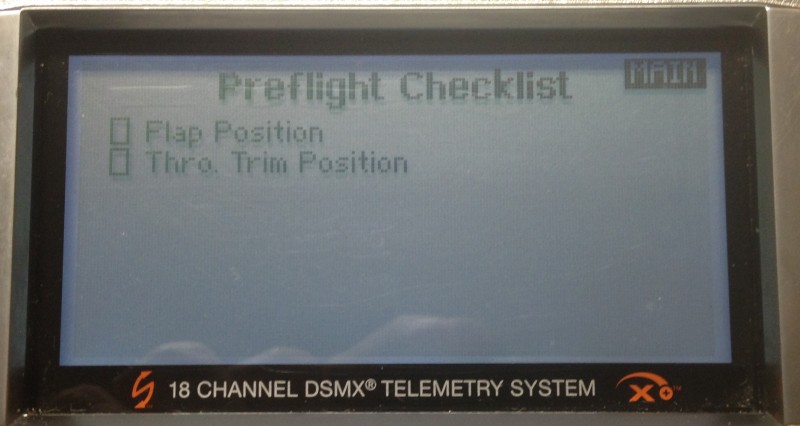
And Here is what the preflight screen looks like on power up.
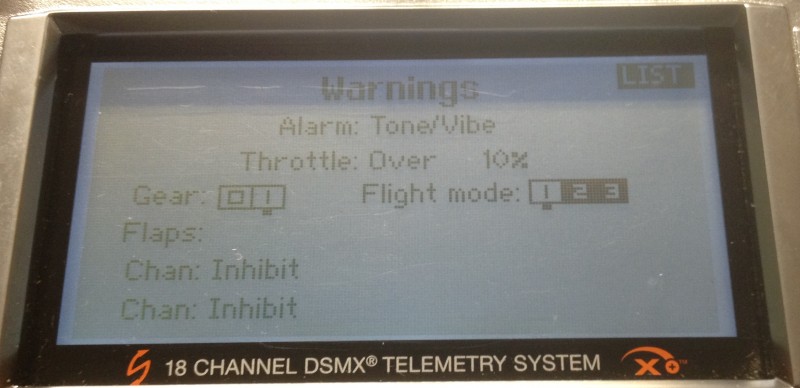
Lastly another thought occurred and I went into the warning screen and made it so my radio would alarm if my throttle wasn’t at idle (or at least nearly so) and/or I wasn’t in FM1 when I start up the radio. That’s even more foolproof than the checklist! Here is the setting for that:
I think this gets me “in the ballpark” as far as radio setup goes. I’ll undoubtedly adjust my expo and dual rate settings but those are minor tweaks. With this configuration I have checked off all of my wish list and gone a bit further on safety and initial start up settings. So far after a couple more test flights after all this was configured I am well pleased.
Only 0ne more issue to tackle… that of visibility. I have some ideas on that and I’ll post on that soon. Happy hovering!
My Second Quad – The Blade Nano QX. First Impressions
Two months or so after first picking up the ProtoX, I was in my local hobby shop. I was just perusing through the latest toys and thinking how I really liked the looks of the new Platinum series Super Cub from E-Flight… but decided to wait on that for a while. I already have plenty of unfinished projects in the shop. As I continued browsing I came to the section where all the quads were displayed. I started thinking of what I wished my ProtoX could do… Binding to a “real” radio, better stability, maybe just a bit bigger to make it more visible… and not too expensive.
After looking over the options I realized the Blade Nano QX might be a lot closer to what I really wanted… and for only $65 or so plus a couple spare batteries… This thing looks great… I should get one. I deserve one. I was reaching for my wallet when I remembered. I was just looking!! I tore myself away just in time and roared out of the parking lot with my money intact… Whew… that was close.
24 hours later I was walking out of the hobby store with my new Blade Nano QX… I was already thinking about how i could program my DX18 to make this thing smooth. Hey, I’m only human!!
Here are the most important parts arrayed on the table…
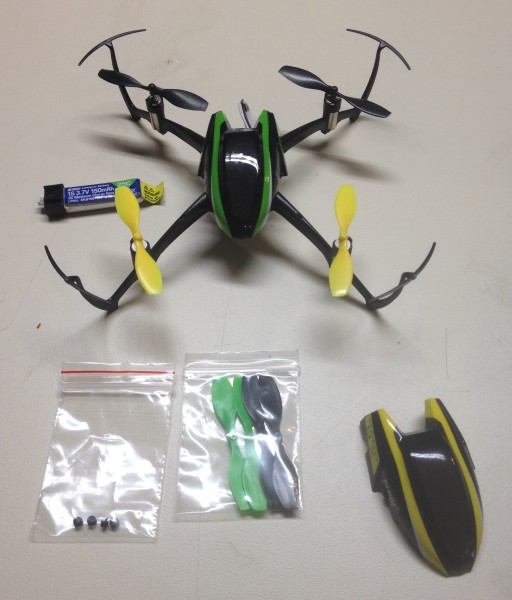
To buy your own from Amazon click here –>BLADE Nano QX BNF Quadcopter
In addition to the additional props, extra canopy and grommets (shown above) there is a USB charger for the included 150mah 25C single cell LiPo.
So I’ve only got a few flights but here’s what I’m thinking so far.
First of all the Nano QX can fly in one of two modes, Stability or Agility. Stability mode utilizes the built in SAFE (Sensor Arrested Flight Envelope) system to keep the 18g quad from getting to far off level to quickly. The biggest noticeable effect of this mode is that when you release a directional control, the system seems to feed in opposite control in order to arrest whatever motion was happening. Add this to the slightly heavier airframe (compared to my ProtoX) and this thing is much easier to keep in a smooth hover.
Switch into the Agility mode and “wow” does everything change. No more automatically stabilizing the Nano when you release the controls. If you push in some “aileron” and then release… the Nano just keeps on moving. You now have to push in some opposite control to get things back to level. It’s very easy to get into oscillations… trailing behind the flight and over-correcting. It can quickly become a problem if you don’t switch back to Stability mode! This is no fault of the Nano of course, just my inexperience with the little quad showing through.
Flight times seem to run about 5:30 to 6:00 minutes before she powers down and forces a landing. The on board LED is used to let you know this is occurring as well as signaling the two modes, for binding, etc… It is not particularly useful for orientation. For that you will have to rely on the canopy coloring and shape along with the color of the 4 props.
I have been flying the Nano QX with the setup of my DX18 configured exactly per the manual for the first flights but I now have some ideas about additional programming I intend to add. I’ll cover that in another posting soon.
Overall I am very happy with the QX so far. It looks like the Stability mode is doing a very nice job and the overall flight characteristics in this mode are very encouraging. Having the advantage of full capability radio (the Nano is a DSMX compatible craft) even doing just the very basic functionality allows for much smoother control of the QX.
I’m already seeing that the biggest disadvantage of the QX is the lack of “navigation” lighting. This means that when moving quickly or when the airframe gets off at a distance, orientation becomes a challenge. I’ll have to look into ways to address that eventually. I’m also going to start with some additional programming to help tame the Agility mode.
Otherwise, my initial impressions are that this is a big step forward compared to the ProtoX. I’m looking forward to getting in some more flying and learning a bit more from the Nano QX.
My Introduction to Quads… The ProtoX
Recently at a charity event I was looking for a way to contribute a few dollars to the “Toys for Tots” when I noticed a tiny little quad on the auction block. I really was just looking to either contribute some money or drive someone else into giving a bit more to the charity but ended up owning a brand new Proto X. Since that event, I’ve been doing a little flying with this little nano-sized quad and having some fun with it.
This is a big departure for me in some folks eyes because I am an unabashed… helicopter basher I guess is the phrase. Much of it is in fun, I have every respect for a good pilot regardless of what he flies. It’s just that I have very little interest in helicopters, especially when flown 3D style. They seem to me the epitome of what I dislike about 3D flying of all types. No grace or beauty… just smashing the sticks and overcoming gravity with pure power. Sure, I know lots of folks love that kind of thing… I’m just not one of them. 15 minutes of watching “3D” flying or helicopters flying in a “non-scale” manner has me itching to do something more interesting. Watching a glider “defying gravity” or any aircraft flying a well flown scale sequence is much more inviting and awe inspiring to me. I know I’m in the minority, but that’s OK with me.
I still have little interest in helicopters in general but the new breed of quad and other multi-rotor platforms are fascinating. With the development of stabilization systems and superior battery technology these things now have some unique capabilities.
The quad I picked up is the Proto X Nano-Sized, Ready-to-Fly. The Proto comes with most of what you will need to fly. A couple AAA batteries inserted into the also-Nano-sized transmitter and a quick charge at the nearest USB port and you are ready to go.
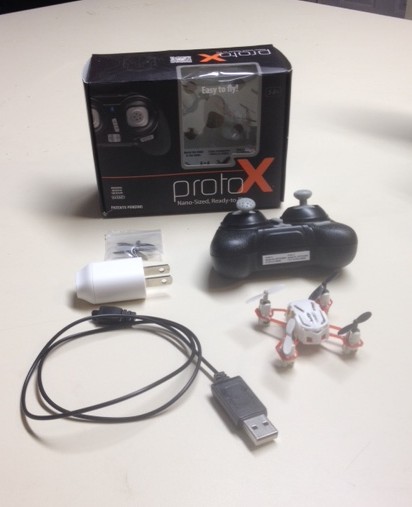
You can buy your own Proto X at amazon by clicking here –> Estes 4606 Proto X Nano R/C Quadcopter
Above is most of what comes in the box… note that you get a spare set of props. The wall wart USB charger is NOT part of the package. I quickly added it to the box so I’d always be able to charge the on board battery if I could find an AC outlet.
Here is my experience with the little quad so far.
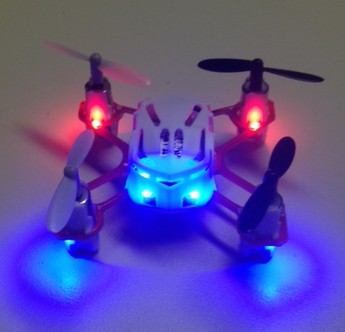
First, the good. This little flier is tough. Running it into furniture, ceiling fans (off), walls, etc… has resulted in almost no damage. I have always tried to drop power whenever a collision is imminent, and I believe that helps. Occasionally a blade will pop off… or two… but as long as you can figure out which motor they came off of (they are coded by letter, blade A to motor A and B to B and you will be fine) it is usually just a matter of press fitting them back in place and you are ready again. In theory you want one color of blade in front and a different color in back but once they start spinning neither are highly visible. There are 8 LEDs on the Proto (Blue in the front) and these serve to keep directional orientation much better than the colored props ever will as well as warning of low voltage (blinking with ~30 seconds left before power loss forces a landing). These make a huge difference in keeping orientation… a real concern for such a small quad. It also has plenty of power and seems to fly for a nice long 5 minutes on a charge. I’ve never timed it but it seems like 15-30 minutes will have it recharged and ready to go again. Here’s a shot of the LEDs doing what they do.
The range of the radio seems to be more than sufficient… I haven’t been able to get far enough away to lose radio link. The Proto is to small to fly more than about 50 feet away anyway! I have read on-line that the battery in the Proto was not meant to be replaced but upon taking off the canopy, I found the battery simply taped in place with an easily removed connector and batteries order-able on line from several sources. I presume earlier models did not have this options so Kudos to Estes/HobbiCo for getting it right!
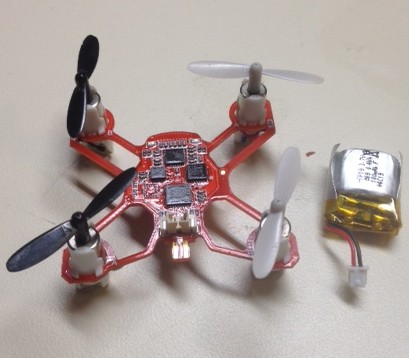
Above is what it looks like minus the canopy. As you can see the battery is easily replaceable.
Another big hit is the price… at $40 (and even $30 in some places) the value at the price seems quite good.
Now for the bad. The included controller for the Proto is more toy than RC hobby grade. For my big hands it is difficult to find a comfortable position to hold the controller. The trim buttons only exist for the right stick and are oddly placed. Finally, the on off switch has “ON” to the left… OK, I realize that may not be universal but it seems like 90% of everything in the world is up or right = on. Here is what it looks like.

I understand there is a better controller available out there that will mate up with the Proto and also enable some additional functionality but that is not what comes with the Proto, and I don’t think I really want to double down on my investment. I find the included controller very distracting/difficult to master. The sticks are just very toy like/very short sticks and not comfortable to my feel. Granted, I’m spoiled with my DX-8 and especially the DX-18. I’d love to try flying this with a real RC radio but sadly just about every manufacturer these days is incompatible with every other.
Continuing on, here are my general impressions of the Proto. I think the Proto is a fun little quad. I don’t know if it’s possible to make such a small and light quad any more stable but I find it to be quite difficult to get the Proto to hover in place or really fly in a truly straight line. It always wants to twist or drift one way or the other. I can herd it in the direction I want it to go and maneuver around obstacles but you have to be constantly correcting to do it and forget getting it trimmed to hover “hands off” and hold position. If that’s possible I haven’t figure it out yet. Add to that the understandable tendency of a craft this small to get pushed around by literally any air movement and stability is not really in its ballpark.
In spite of that, I enjoy flying the Proto. Hopefully, I can still learn some directional awareness the way you can learn control reversals for a fixed wing by flying on your simulator. Fixed wing craft don’t do much flying tail first as a rotary craft can, so that is probably a useful skill to work on. Otherwise the small controller and stability issues will probably limit my learning much I can apply to larger quads. That’s not to say I won’t keep flying it for a while. It’s still a lot of fun. Just more toy than RC fun in my estimation. For $30 it would be hard to find anything better. This is the definition of a beginners quad.
Pick one up if you want some basic flying fun in the living room. Just make sure you turn off the ceiling fan! 🙂
Parkzone T-28 – My 3rd
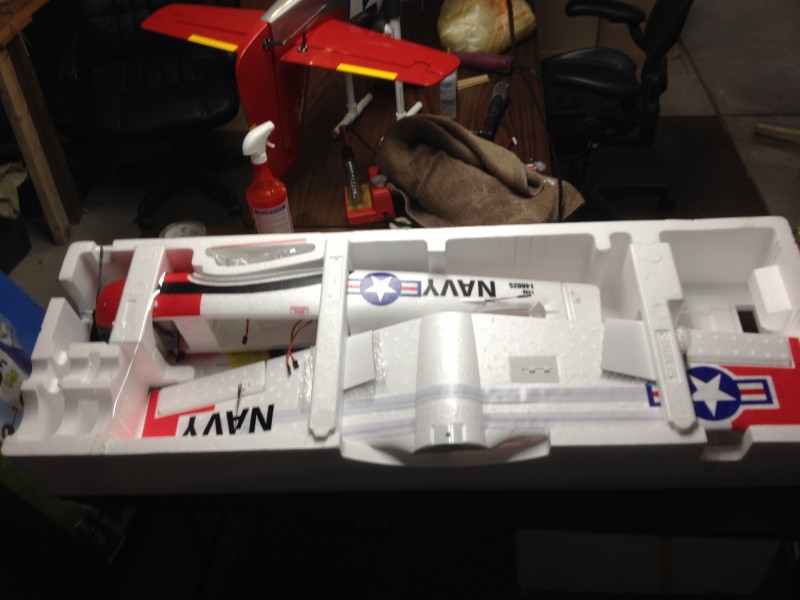
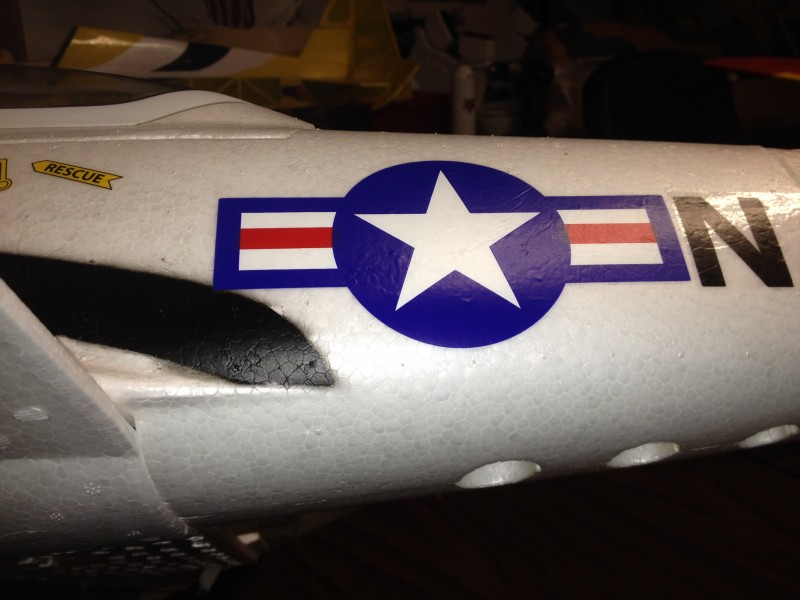
I picked up a new PZ T-28 to replace the one I retired a couple months back. I started having motor issues and had at least one servo starting to chatter, plus the foam was showing a lot of wear. Additionally it was the US Air Force color scheme which is beautiful up close but very hard to see under anything but perfect lighting conditions. I like to fly this plane near dusk and sometimes far up and out at times and poor visibility is an unnecessary limiting factor so I had been wishing to get back to the Navy scheme since about 2 days after I bought the last one!
Since I was pulling a new ARF out of the box anyway I thought I’d post some comments. First, it seems that PZ really knows how to pack an airplane. The packaging kept the plane very secure and I found no dents or dings at all. As you can see here, its very nicely packed.
Second, the manual (which I didn’t need, since I’d done this twice before) is well written, apparently by a native US/English speaking person (at least the US/English portion, I can’t comment on the rest of the languages) which I find refreshing compared to some I’ve seen. No offense intended to those who are native speakers of other languages but I would expect a product sold in a particular country should have a manual that is written clearly in the native tongue of that land. Everything seemed to be present and accounted for so assembly was pretty quick.
Looking the airplane over there are some drawbacks. The paint job suffered from a bit of over spray and the decals have quite a few wrinkles and bubbles. While I still like the overall look of the airplane, it could look better with a bit more care in production. Here is an example.
That aside, I have now flown the new plane a dozen flights or so and just as I remember it is a hard to beat little airplane. Somehow it seems to fly bigger than it is. While not capable of unlimited vertical… no hovering for this bird… the plane has enough power to climb rapidly and quite a bit of aerobatics are within its flight envelope. Even better, the plane flies super stable (without needing a stabilization system) and can handle a lot more wind than you would imagine for a 2 pound foamy. I can fly around all day doing knife-edge or simply putt along making wide sweeping turns and making low passes and it will do either equally well. It just flies great. It also will fly with a wide variety of battery packs. I’ve flown them with everything from 1500-2200 3S packs from 15C to 45C discharge rates (static testing showed about 14A, so 15C is sufficient) and any of them will work. Lower capacity batteries which are lighter and high C rated packs improve performance but the lower end (cheaper) batteries work well and keep costs down so suit yourself!
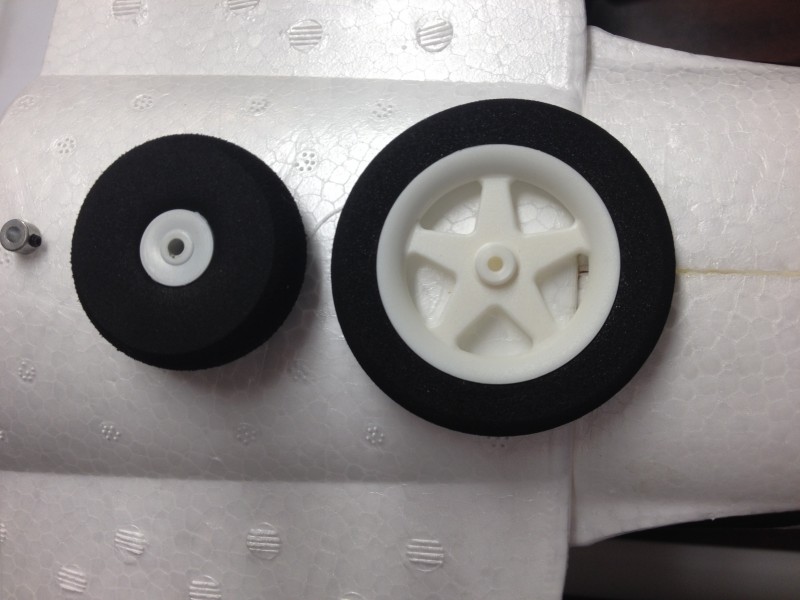
In the past I had typically hand launched the T-28 as the small wheels are not always conducive to upright landings and smooth takeoffs. I have been a proponent of getting rid of the wheels from the beginning as it also lightens the plane up a bit… always good in an airplane that doesn’t have unlimited vertical anyway. This time, however, I decided to get back to some wheels takeoff and landings so decided to put them on. They were a problem on our grass field. Not intolerable but occasional flip overs and difficulty taking off with anything less than full throttle and full up elevator. I like a nice easy takeoff and upright landings so I recently changed them out for some Dubro lightweight wheels that I’ve seen others use on the other similar size PZ aircraft. Here is a comparison of the old (smaller) wheels and the newer, larger set. (Dubro 250MS)
Here is the complete set installed. The existing axle caps unscrew and so can be reused but I did need some wheel collars to add inside the wheels to keep them from rubbing the wires. I also had to drill the wheels out to 7/64ths to fit the wire axles.
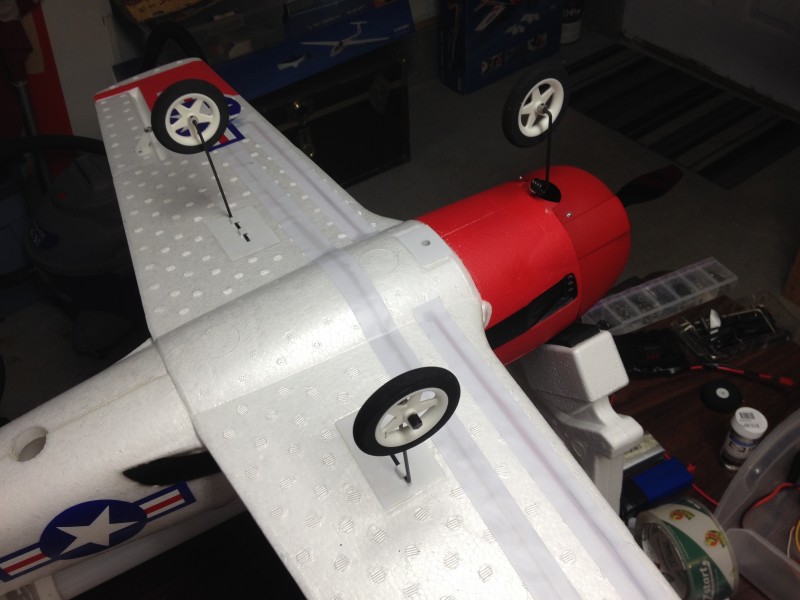
I flew at the local field using these the other day and it really makes a difference. Much easier to roll on the grass and landing went great. The nose occasionally will dip as the landing gear bends back but not a big issue and I think extending the nose gear just bit will help with that as well.
One final construction note. I have noticed in the past that the wing tends to rock just a bit when installed, even with the machine screw at the front nice and tight. In order to keep the wing snug, I add some wing saddle tape to the body before I install it. This tightens things up remarkably.
Since I had an extra Telemetry receiver lying around…. I had to install it, and an altitude module, and… well I’m still working on the rest! Don’t know how long I’ll leave it in there but it’s fun to gather some data.