All props are not created equal… Static thrust and current measurements.

Well, I’m up to date reading the discussion thread on the Carbon Cub and there has been a fair amount of discussion about a suitable replacement prop to use in conjunction with the stock motor.  Some have continued to run just the stock prop while others have branched out to (most commonly) the nearest APC equivalent.  A few folks have actually measured the current draw using the stock prop or the APC 15x6E but I only recall one who did a side by side comparison of the two props current draw.   The results seemed intuitive… more current from a higher pitch prop… but the difference seemed incredible and I was wondering how much more thrust must be produced considering the reported 10A delta!  10A more current at (just a guess) 20V is 200W of power!  That’s in the neighborhood of 20%!!  Based on my experience with similar sized planes with glow and gas engines 20% is huge.  I decided I had to do my own test and measure not only current but thrust as well.

The BL50 stock motor with the stock propeller and a fully charged 6S Lipo seems to draw somewhere between 56-63 Amps in my own tests and that jives with readings reported by others.  Of course there will always be some variance between batteries (internal resistance/C ratings), connector losses, etc… Plus the measuring equipment we are using is not exactly lab grade but there have been plenty of tests reported that fall predominately within this range.

Based on that data alone, there have been several that have stated that putting the 15×6 APC E on this setup is to invite disaster as the higher pitch prop will draw more current and the stock ESC is only rated at 60A continuous (ignore for the moment that the ESC is rated for 15 second peaks to 75A).  That one older post that compares the two even showed a video clip of a current measurement using the APC and topping out at 66A compared to 56A for the stock prop.   I have been in the hobby long enough to realize that comparing props across brand is perilous as the blade shapes, thickness, stiffness, taper, etc… are different across product lines and this can have pronounced affects on the performance of a propeller but a .5″ pitch change (pitch has much less affect on the loading of a motor than does diameter) to have this big an effect seemed unlikely.

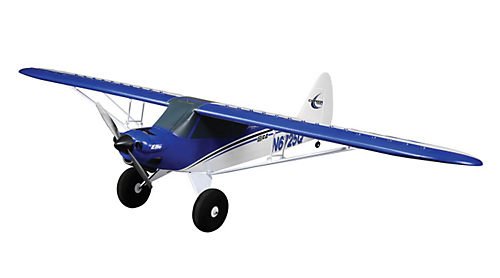
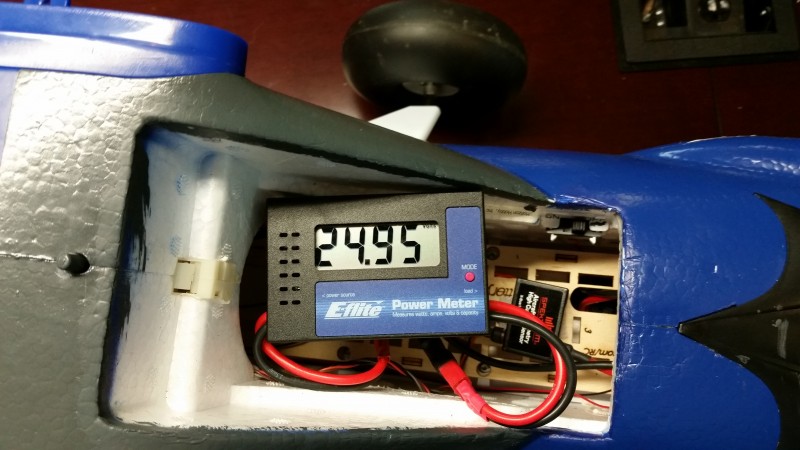
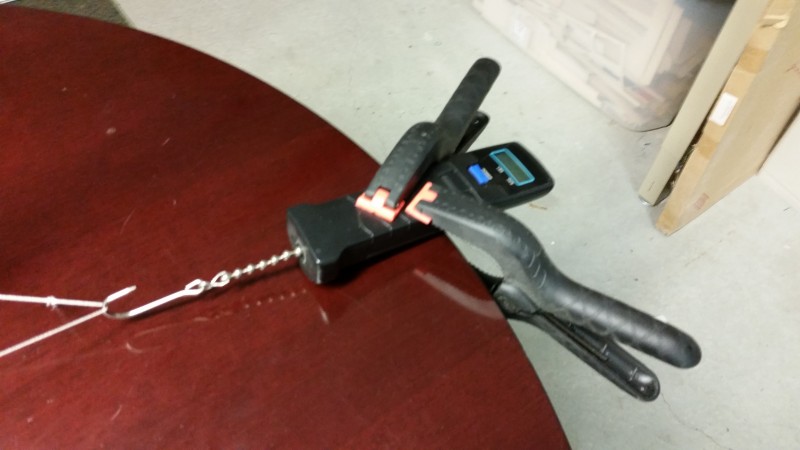
With this in mind I rigged up a test setup on the bench and drafted my buddy’s CZC that is currently in the shop so I could test with two identical airplanes.  I tested both with the same battery and with both the APC E 15×6 and the stock PZ 15×5.5 and measured both current draw and static thrust (as best I could).  My test setup used the E-Flite current meter which is rated to handle more than 100A and my precision thrust measuring device secured to the table.  Here is picture of the setup using a harness passing through the wing tube attached to the “thrust meter”.

2015-01-11 17.15.15

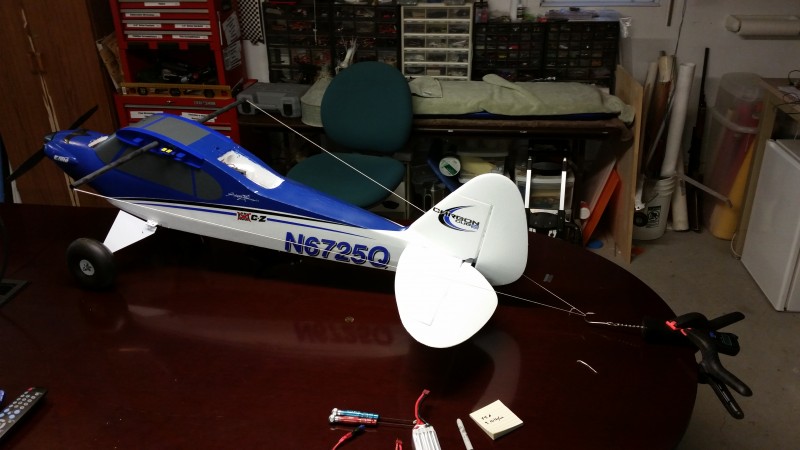
Here is the meter just showing the pack starting voltage

2015-01-11 17.17.54

and the “Thrust measuring device”.  This has some protrusions on the back that grab the edge of the table nicely when held down by the two large spring clips.

2015-01-11 17.15.24

I started with a fully charged battery and only ran for 5 seconds or so at wide-open with a nice smooth run up in each case.  My wife read the digital fish scale (I mean precision thrust measuring device of course) and I manned the radio and Amp meter.  Here are my results (both planes fell within these ranges…)

The two birds both ran the APC at between 53-55A with measured thrust from 9lb 10oz to 10lb.

Switching to the stock propeller the current measurements were as expected/previously reported from 56-63A with thrust produced 10lb 12oz and 11lb.

So as expected the 15×6 drew much more… oh, wait… not so much!!  That can’t be right… can it!  How could the APC draw less??  I tested once more with the APC a day or so later using another fresh pack and my newly installed Spektrum Telemetry High Current Sensor.  Same outcome at about 54A.

So contrary to popular “mythology” the 15×6 APC E prop did NOT draw more current than the stock 15×5.5!  In fact, in my tests it draws significantly less and would therefore be less strain on the ESC and motor of the CZC!  Of course, the prop does produce less thrust as well… as usual you don’t get something for nothing.  While these measurements are certainly counter to expectations, as previously noted you just can’t make assumptions based on mixing brands.  The difference in manufacturers blade designs, stiffness of the blade material, etc… can make hash out of those assumptions.  This really stresses the need for individual testing.  I cannot account for how different my results are from the video posted in the discussion group.  All I can do is tell you what I found.

My advice, beyond testing for yourself, is NOT to be concerned that the APC 15x6E will cause a quick demise of the motor or ESC in the Carbon-Z Cub.  Not only does that seem to be untrue but this prop may actually make such an event less likely!

I’m very anxious to do some flying with on board telemetry to measure (at least) battery voltage under load as well as current draw to see how much unloading the prop affects these static measurements as well as do some comparison flights to see how it handles with each.  Hopefully I can also correlate RPMs and temp at the battery or ESC or motor.

 Update with some in-flight readings….

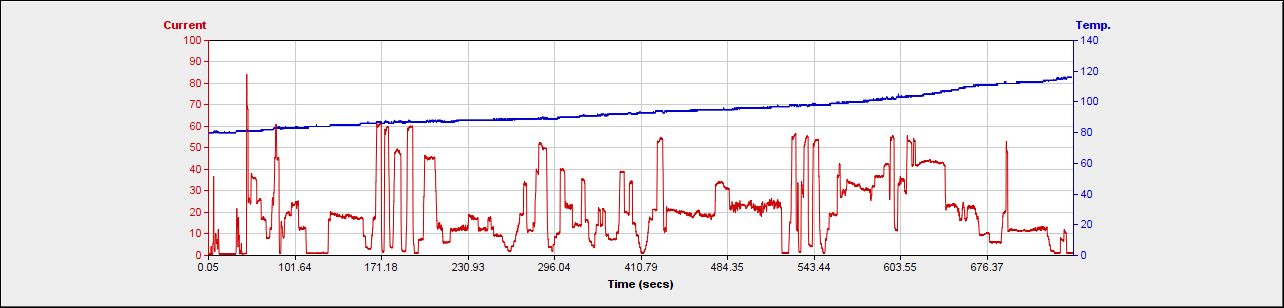
I have probably a dozen flights on this combination since originally posting this and in-flight amp readings via the Spectrum telemetry current probe has shown results with the APC prop that are fairly much in line with the static tests.  Here is a sample showing current measurements over the course of a 14+ minute flight (including ground time, taxi, etc…)

4-17-2015 8-38-52 AM

As you can see the current peaks at about 71 amps on one occasions and about 62 on a couple of others but averages more like 15A during most of the flight.  The speed controller on this plane should be loafing, with little or no heat buildup as is the battery (temperature shown…ambient on the day in question was about 65F).  I haven’t got any readings on temp at the motor but I am unconcerned as this point based on the light loading during 95% of the flight.  This was a pretty typical flight for me with touch and go, inverted flight, loops rolls and an occasional hard vertical or prop hang for a few seconds.  I think even doing a full on 3D flight would provide little reason for concern.

 2nd Update with some more in-flight readings….

Got a few flights yesterday with the stock prop back in place and telemetry recording the current.  Ambient temp a bit warmer… 72F or so… also known as beautiful with almost zero wind.  Perfect.  Here is a sample showing current measurements over the course of a 14+ minute flight.

4-18-2015 9-32-38 AM

As you can see there are a few higher peaks with one instance where current draws hitting 80A plus for a brief instance but otherwise it looks much like the APC prop.  Flight times seem unaffected with perhaps a small increase in flight times when spinning the APC but it’s not a noticeable difference.  The only way I know is just looking at the length of the files and seeing that I averaged 30 seconds or so more per flight on the APC prop but that could be coincidence.  I’d say fly whichever one suits you… they both seem to do a great job with no concern for overheating or causing issues for the setup.

Carbon Z Cub – Flight times, batteries, Telemetry and more.

The Carbon Z Cub flew on 3 different battery packs on New Year’s day and considering the temperature (15F or so) and the winds (~15MPH and largely across the runway) it flew quite well.  Flying with a stock setup with the exception of the Dubro 6″ inflatable tires, the recommended 3200mah 30C E-Flite 6S pack kept the cub up for somewhere between 10-13 minutes.  This flight was a fair mix of smooth and easy flying mixed with loops, rolls, stall turns, etc…  Especially considering the temperature, I was quite happy with the flight time.  Testing back in the shop showed all cells at between 3.70 and 3.74V and a recharge required 3006ma before the charger shut off and the cells stabilized at 4.17-4.18V per cell.  I did not even fly to the point of voltage cut-off but I imagine I was very close!

The second battery is a GForce 40C 3700mah 6S.  I flew approximately 10 minutes and later testing showed the cells at ~3.8V per cell.  Recharge took 2863ma to bring the battery up to 4.19-4.20v per cell.  Again, I did not fly ’till cutoff and it appears I had another 2 or 3 minutes of flight time available at a minimum.

The Dubro wheels, which add 3/4 of a pound of weight to the aircraft, may have had a minor effect on the climb rate of the Carbon Z but it was still able to climb straight up for at least a couple hundred feet and then hold a hover, though pulling up out of the hover is only possible early in the pack.  I am very happy with this level of performance.

The other effect of the additional weight is a shift in the balance since the wheels are well forward.  Using the Mills battery tray, it is fairly easy to push the batteries way back and keep the balance only slightly ahead of the recommended.

The cub was quite manageable in the 15 MPH crosswind… keep in mind I do NOT have an AS3X receiver in my aircraft… though I would prefer not to be flying in any stronger crosswinds!

I did get a TM1000 Telemetry receiver installed before the flight so I have records showing the receiver voltage and battery temperature for the flights.  Since the batteries were kept warm before hand they mostly started around 50-55 degrees and showed a slight temp increase toward the end of the flights… only a few degrees overall.  Likewise the receiver voltage was pretty stable.  Staying between ~4.8-5V for the entirety of the flights.

I have some plans to add a high current sensor as well as possibly a voltage sensor on the main battery connection and altimeter.  I may also move the temperature sensor to the speed controller…

Also, I got in a very short flight with a borrowed 5 cell pack.  What I failed to take into account is that the E-Flite speed control is set (by default) to use 6S packs!  This led to some anxious moments when shortly after takeoff, the pulsing of the motor that signals the battery is low was clearly heard!  This quickly reminded me of the default setting… which I had meant to override.  A bit of careful throttle management got the cub back around and on the ground safely.  If you intend to fly anything aside from 6S packs, I highly recommend you reset the speed control to the “automatic/70%” setting so it will warn you of a low voltage only at the appropriate time based on the original voltage seen at power up.

Be warned that if you elect to utilize this setting, you should insure that a fresh pack is installed at each power up as anything else may fool the controller into setting its cutoff voltage to something that could easily be low enough to damage the pack if you actually reach the “pulsing” warning level.

Finally, of course I came back with more paint loss around the front battery hatch <sigh>.  I intend to make some further efforts to help limit this problem but I want to get some “personalization” done first so for now it looks like just continuing to touch up after every flying session will be the rule.


Carbon Z Cub – First changes/modifications.

I’ve spent a fair amount of time scouring the forums and am currently up to about page 400 in the 1000+ page discussion of the E-Flite Carbon-Z cub on RC Groups.  If you care to read all about it click here.  Just to be clear, the cub doesn’t necessarily NEED any modification to fly well.  It appears quite capable and fun to fly right out of the box but I’m one to “tweak” a bit on every plane in order to get a bit more out of the plane, increase the fun factor and hopefully the life of the airplane.

Using input from the discussion group and based on my own experience with this model as well as others, here are three areas where I’ve made changes to the airplane so far.

1.  I continue to be disappointed with the paint.  Just normal handling, battery insertion, etc.. has caused 3 or 4 areas of paint flaking off already.  My first step in combating this was to head to the local home improvement store and get computer matched blue and gray, satin, interior house paint samples.  Each is a half pint (probably a lifetime supply barring drying up) and cost is only about $3.  It was suggested to take the two hatches in to have them computer matched… but of course I forgot and left them at home so had to find the pictures in the forum on my smart phone and have them mixed off the numbers on the labels that someone was kind enough to post.  I suggest you do your own computer match instead as that has a better chance of exact matches to the paint on your cub but mine came out excellent… I was lucky.  Using this paint I have already touched up 4 spots on the cub and other than a very small difference in “sheen” I’d say it is an excellent match.  It does take two coats of blue to get the color perfect over bare foam.  Also, it does look bright when you apply it but after drying it is a great match.

2.  Bought and static tested an APC 15×6 E prop which has received some good reviews on line… Static tests indicate that a full charged stock E-Flite 3200 6S 30C pack with the stock 15×5.5 propeller is drawing 59 Amps right off charge.  The cells sag to maybe 20V which equates to about 1200 Watts.  1200 Watts with a sub 9lb airframe equates to ~133 Watts per lb.  For a cub… that is somewhere between high and rocket powered!  In addition, 59 Amps is just under the 60A continuous rating of the speed controller and well under the 75A peak allowed so all is well with this setup.  Static testing of the new APC propeller had it pulling only 54 Amps.  Flight testing and perhaps some static thrust measurements will be interesting.  If the APC can produce as much thrust as the stock setup and use less amps it would prove that it is simply a more efficient airfoil… If it does not produce equal or better power than I may stay with the stock prop for at least a while longer.  Stay tuned on this one.  Propellers are often a quick and easy upgrade and this test so far proves that you cannot use diameter and pitch measurements to compare propellers across brands.  The airfoil design is key and the listed measurements from the manufacturer are to be taken with a grain of salt.

3.  I purchased some DuBro 6″ inflatable tires to replace to stock foam tires.  The stock tires are considered by most to be acceptable for grass fields only.  I don’t even really like them on grass as they seem to have almost zero cushioning capability and the heavy wire landing gear is mounted into foam and plastic which seems like a possible weak spot.  In order to protect that mounting, I am going to try the DuBro wheels with minimal air pressure.  They are almost 3/4 of a pound heavier than stock so I will lose a little power/weight ratio but I can compensate somewhat by keeping to smaller battery packs (folks are running up to 5500 mah packs… so far I’m staying with 3300-3700).

I’m considering quite a few other additions, modifications, updates, etc. that I’ll discuss as I decide on and implement them.  Most likely there will be telemetry installed as well as some personalization of the color scheme, flap/elevator mix testing, and more.

Right now I’m getting prepared to go flying on new years day which is currently being predicted to be a balmy 20-25 degrees(F) and 10-15mph winds…  First to explore is whether I can get the Cub into the trailer fully assembled to avoid freezing fingers having to assemble in the cold!

Hitec X4 Micro AC/DC 1 cell LiPo charger

I have taken to doing some indoor flying over the past couple of winter seasons as the bitter cold and snow of Indiana this time of year is not particularly conducive to just hanging out at the field.  It’s a lot of fun, but is yet another specialized endeavor within RC which means there is some specialized gear available to help you get the most out of your time spent.  I.E. More toys!!

For instance, most of the small indoor aircraft use a single cell LiPo in the 30-200mah range and tend to eat up those precious little milli-amps in a short 4-8 minute flight.  That means over the course of a 3 hour indoor session you can run down a BUNCH of batteries.  I tend to take some pictures, talk with the other pilots about their aircraft and find other ways to distract myself for much of the time but I can still run short of charged batteries in a hurry.  This is especially true when flying a little quad that can use up a battery in 4 minutes.  Along with buying ever more batteries, I’m doing a fair amount of recharging at the gym.

At first, just using the single chargers that come with many of these airplanes was OK, but those chargers can be slow, are sometimes bulky and they either have to plug-in to an AC outlet or run off AA batteries depending on the whim of the manufacturer.  It’s easy to end up with nearly dead AAs inside those chargers at the worst time and there is never enough space on my 2 wheel cart going in and out of the gym so my array of 4 single cell chargers (powered by 16 rechargable AAs) had to go!

At first my solution was simple.  I have a couple of buddies who each have one of the Thunder Power Quad Port AC/DC chargers.  I would just borrow a charge port or two from my flying buddies!!  This works alright and they don’t mind sharing (not much anyway) but there were never enough charge slots available and I was hoping for something a bit better.  I tried to drop hints that those guys needed to upgrade their chargers but I’m the gadget guy of the bunch… I like buttons and switches (if they serve a purpose) and they were happy with the simplistic but effective little Thunder Power.  Here is the little TP with a link to see it on Amazon.

 Thunder Power Quad Port Charger

After a little research on the web, I decided to pick up the Hitec X4 Micro.  At a bit over $50 it’s a bit more expensive than the TP but it has several nice features.

hrcp4212[1]
X4 Micro AC/DC 1C LiPo Charger  <- Click here to see/purchase this on Amazon

The Hitec can not only charge 4 batteries simultaneously at anything from .1 to 1 A rates, but it has a separate LED display for each of the four charge circuits so you can tell what is going on with all 4 with a glance.  To charge just plug in to any of the 4 sockets as appropriate for your battery connector type, dial up the rate you’d like to charge and push down and hold the red start/stop button for a few  seconds (until the led lights solid and you hear a longer beep) and you are charging.  If you just momentarily tap the button before charging you will be shown the current cell voltage (and hear a short beep).  During charging the display sequences through showing you the current charge rate, the current cell voltage and the amount of charge taken (in ma).  When the charge is complete you are treated to a green light along with a series of 5 beeps and the word FULL on the screen.  This alone may be worth the price of admission for some.  One of my flying buddies is effectively red/green color blind so you can imagine that seeing FULL displayed might be more helpful for him than just a red or green LED.  With FULL displayed you can tap the button again and get a cycling display showing the end voltage, the total milliamps provided to the battery during the charge cycle and the FULL display.  With AC or DC input options, along with an AC cord and DC connection with alligator clips all supplied, this little charger is at home and ready to work on the bench or at the gym.

While the Thunder Power is a fine little charger (and it is much smaller than the Hitec which can be an important plot point) it can’t compete in my mind because of what for me are the two big pluses afforded by the Hitec.  First is the array of information available to me when using the Hitec.  The TP just tells me charged or not via the red/green LED.  The Hitec keeps me informed from start to finish. Secondly is the ability to control the charge rate.  This is handy in both protecting my batteries from being “beat up” by a to high charge rate and to take advantage of faster charge rates when I want to based on the capability of the battery under charge.  Most of the little 1 cell chargers do so at a fixed rate… in the case of the TP for instance .3A… period.  Want to charge your 30mah cell?  Hope it likes to charge at 10C cause that is what it is going to get.  Fast but brutal!!  How about your 200mah?  You guessed it, .3A and I hope you aren’t in a big hurry cause it’s going to take 40 minutes or so.  Don’t get me wrong, chargers like the TP are fairly inexpensive (Around $35 at the moment) and work pretty well for most applications, but I like to have more control over the charge process and know a little more about what is taking place.  With the Hitec I can charge my 150mah E-Flite at it’s max charge rate of 3C (450ma) for a quick 20 minute charge when I really want to get back in the air fast but when the session is over and I’m back on the bench getting things ready for the next fly, I can just as easily drop down to a leisurely 150ma 1 hour charge.

I will say that the Hitec does require you understand a bit more of what you are doing in order to be used correctly.  You have to pay attention and set the charge current accurately to get maximum benefit from the box (easy to do with the display and just a little knowledge).  In my book that’s just another part of the hobby and one I enjoy actually so this is my kind of tool and for $50 I think the price is reasonable.

The other price you pay for the extra features of the Hitec is a little bit of bulk.  The Hitec is pretty compact for what it can do (especially for an AC or DC unit) but your not going to stick it in your shirt pocket either.  Still compared to the single cell units I was using this will take up the same space as one, and do the work of 4 so all in all I expect this thing is going to work out well for the intended job.  I’ll update as I get more experience if anything changes my mind but at the moment I’m thinking the Hitec X4 Micro is a keeper.


E-Flite Carbon Z Cub – First flight and glider tow!

After waiting for the warmest temps of the day to arrive (while watching my favorite NFL team squeak out another win) I and my buddy Steve headed to the field to get a first flight on the Carbon Z.  We had about an hour of daylight left with temps in the mid 40s and a mild 5-10mph wind mostly down the runway to work with when we got to the flying field.  For early winter in these parts, about as good as it gets.

Assembling the cub in the cool weather was a bit chilling but not overly difficult or time consuming.  If you have to have struts, these aren’t to bad to put in place.  First order of business was to make a short hop to check trim and dynamic balance and overall just get a feel for how the Carbon Z would fly.  The result?  Pretty much as expected.  The big Cub found the sky very quickly before I had gotten much past 1/3rd throttle!  Subsequent takeoffs were found to be possible in about 4 feet… and that is without use of the flaps.

With only a couple clicks of trim, the cub flew nicely.  Using the wing and somewhat less control throw than recommend even for “low” settings in the manual, the cub was immediately discovered to be more capable than any cub I’ve ever flown or even seen flown.  Power was adequate for nearly unlimited 90 degree vertical climbs, continuous knife edge, 20 foot diameter loops, rolls, stall turns, etc…  No problem.  After 3 minutes or so, a nice, gentle main wheels only landing was accomplished.  We quickly then rigged up my friends brand new KA-8 glider and with a very smooth mid-power climb he was hauled up to about 250 feet where he successfully released and began floating around the field.   The cub was brought in for a quick landing so I could watch Steve’s KA-8 floating about and then making a near perfect “spoilers” landing within 20′ of where we stood.  Nice job on the first flight Steve!

After clearing the tow line and moving the glider away, Steve took the Cub up for a quick spin and commented immediately on the ample power and stability of the Carbon Z.  After a few minutes of fun, Steve brought the big bird down for nice landing of his own.

Before the light could totally fail, I took the bird up for one more flight.  First, I climbed up to a safe altitude and tried deploying the flaps.  The resultant pitch up was fairly dramatic, and that was with the lesser of two flap settings I had programmed.  That will require some more research and programming!  Pushing the envelope a bit further I started through the basic IMAC sequence as best I could recall from earlier this year.  The Cub seemed to be doing fine with the maneuvers until the motor started to pulse and it was time to come in for another easy landing.  Altogether, I had been above 10% throttle for about 13 minutes.  Better than I expected for the 3300mah pack, especially in cool weather.

Even though the Cub landed very gently, I do want to get some softer wheels for those times when something slightly more harsh occurs and the flap mix and travel are going to require some more adjustment and testing.  As well, I will be getting some more batteries of somewhat varying size and brand.  I think the cub could easily handle somewhat larger cells and I wouldn’t mind to have a bit more flight time per pack.  With a safety margin, the 3300s would appear to give me a solid 10 minutes of more aggressive or maybe 12 of pure cruising.  I’m guessing this might translate to only 2 or 3 glider tow climbs and in this mode I really would like to have to stretch that to 4 or 5.  Once I have some more batteries in hand I can do some test flights and see what sort of trade off between capacity and weight is possible.

Overall, after one battery (3 short flights) I can already tell the big cub is going to be a lot of fun.  I’m looking forward to getting her out at the next club event (the Freeze Fly on January 1st).  With these bug tundra style tires, even a little snow shouldn’t present a problem.  And if the snow gets deep… the floats are sitting in the box out in the shop.

E-Flite Carbon-Z Cub… Modifications and Setup

With cold weather and rain the rule for the first few days after the initial assembly of the CZ Cub I turned to setting up my radio and adding one or two “upgrades”.

First up, I went through and put triple rate control throws and levels of expo on my radio. Also I set up for a stopwatch timer as I am unsure of the flight times I can get from the recommended Eflite 30C 5S 3200mah battery I purchased. From there I setup the flap system with a nice slow 2 second deployment and 20 percent of down elevator throw. Unfortunately with no indication of how much Flap throw is considered normal there is no way to know how much flap or how much elevator mix will be required to offset it. The manual says 42% of elevator but that is hardly helpful with no idea of 42% of what!

Continuing on, I had read some forums that indicated that the paint around the front hatch was prone to damage due to trying to get hands and batteries in and out and that a new battery tray that was laser cut helped with this issue. I decided that this made some sense so I ordered the Morgan Mills RC battery cartridge system and installed it. Assembly was easy once I viewed the assembly video on line about 3 times! If you don’t do that, good luck as there are NO included instructions!! The tray and cartridge seem very nice so far and definitely make getting batteries in and out easier.  This is the part that replaces the plastic tray inside the airplane.

2014-12-14 11.37.44

And this is the battery holder that you put the battery in before insertion into the airplane.   I added the small rubber dots you see to keep the pack from sliding even the small bit that is allowed by the tray.  I also used my own double sided industrial strength Velcro instead of the stuff that came in the airplane (it seems a bit weak when you consider how heavy the battery is that your securing).

2014-12-14 11.36.33

So far, playing on the bench, it seems to work very nicely and the ability to easily reposition a battery to exactly the same spot every time you put it in the plane is certainly going to help, especially if you plan on running more than one size/weight pack (like I likely will).

The downside of all this is that folks are right on when they say the paint in this area is fragile. In fact, I think it is pitiful… Even being aware of the issue and trying to take great care, I have already lost a fair amount of paint in this area before I’ve even made my first flight. This is very disappointing… I realize this is a foamie but it’s a fairly expensive foamie (not the original cost so much as the total investment) and there’s got to be a better way to get the paint to stick to this foam. It really worries me as to how well the rest of the paint is going to hold up. My investment at this point with battery, receiver, plane, floats, and glider release servos is over $600. I’d like to have this thing look decent for more than the first 2 weeks! I was thinking the overall price on the CZ Cub was pretty nice for this large a plane… foam or not… but I was expecting to keep the paint attached for more than a few days.  Very disappointing even if it is only cosmetic.  Here is a close up shot showing what has already occurred in just a few days.

2014-12-14 11.49.36

Next I went to install the glider tow release servo. I love that the CZ Cub has this built in with only a servo needed to make it operational. I have two buddies who would love to have a good tow ship available to get their gliders aloft and this thing could be just the ticket! I wish the instructions were a bit clearer… or maybe just a better diagram but the actual mounting point looks a bit different than the diagram with no direction given as to what type of screw to use to mount the servo… at least E-Flite is consistent! In actual practice I ended up using one screw through the servo mounting hole on the servo and another just overlaps the end of the servo mounting tab and clamps it in place. It seems very strange but seems to work so far.

At this point I am ready to fly and while I am trying to tamp down my expectations I really am expecting some good performance.  The plane only weighs 8.5lbs ready to fly at this point and with the 6S power, flaps and huge wing area it should be a real floater with some excellent power to weight ratio.  Can’t wait to fly!


E-Flite Carbon-Z Cub… Unpacking and Assembly

I recently purchased a new Carbon-Z Cub, produced by E-Flight and distributed by Horizon Hobby.

E-flite 10475 Carbon-Z Cub PNP

  Carbon Z Cub <– Click here for purchasing options via Amazon

After some research, I bought the PNP version because I really didn’t want the AS3X in a plane of this size. I’m a big fan of that technology in the small planes where it can aid immensely. I’ve owned a couple with AS3X and these planes fly well in windy conditions that would completely overwhelm me (and I think most pilots) without it. There are lots of other reasons I went this way (in spite of a very low delta in price) but the two main reasons are that I don’t like the receiver essentially limiting what I can do with my radio (things like end point adjustments, rates and exponential) and maybe most importantly an 84″, 8.5lb Cub probably just doesn’t need it!

So back to the beginning… I got the cub home and started to unpack it. Firstly, it seemed to be very well packed as you can see below…

2014-12-06 16.01.46

with only one really noticeable case of shipping rash and no real damage. Here’s the worst of it… the right wingtip.

2014-12-06 16.10.11

It’ll probably get worse than this soon… but I can’t help wishing it had come out entirely pristine!  Oh well, it’s probably to much to ask that an airplane made of the same materials that it is packed in is going to come out of the box perfect.  Actually this is pretty minor compared to the rash many planes come out of the box with.

After laying it all out on a large table (the plane is big). I started assembly and immediately ran into two of the issues that I have heard mentioned before. First, the included wheels are made of some sort of very dense foam and while lite… are very, very hard. It is an effort to even dent them by gripping them and trying to crush them by hand. Combined with the landing gear mounting in foam and hard plastic and this leads to a concern about how well the landing gear will hold up in the long run, especially whether the foam will crush or the plastic crack under the stress. The wheels sure aren’t going to cushion anything!  I’ll have to consider finding some wheels with a bit more bounce.

Next there was an issue trying to find the right screws to mount the gear and this issue continued throughout the assembly of this ARF. This has apparently been an issue since day one and even the addition of single sheet “fastener guide” didn’t do enough (at least for me) to sort out the issue. It’s kind of funny when you realize that this has been overcome quite effectively by many ARF manufacturers in the past using a variety of methods but somehow E-Flite couldn’t figure out a simple way to label the various parts and call them out for easy identification.  Adding to the confusion is the fact that extra hardware is included in the kit… normally a very good thing, but in this case… adding to the confusion. Eventually I figured it all out… I think.

As the assembly progressed I ran into another issue where the instructions could have been improved. Keeping in mind that you are working with a largely foam and plastic (and very large) airplane, it might be nice to mention just how tightly some of these fasteners should be. For instance, in a later step you attach the wing with a couple of bolts but if you tighten these down to much… foam starts to crush. It doesn’t take as much force as you might think, so be cautious not to over tighten!! It IS a big plane, but it’s still a foamie!

One more assembly item came up when I was mounting the motor. There is a lot of wire between the motor and the speed controller and no mention of what to do with it all in the instructions. This is important because the motor is an outrunner and you do NOT want the wires to abrade against the motor casing. I did not like the idea of stuffing the wires back around what might become a rather hot speed control… hot metal and wires don’t mix, nor did I want to block airflow. So, I wrapped the wires inside the cowl and secured them with some clear silicone calk… Here is what that looks like…

2014-12-07 16.57.24

Hopefully this works out well.  I’ll try to keep an eye on them.

In spite of all of the above, it only took around 2 hours to complete assembly of the big Cub and depending on how the landing gear survives, it looks like the result is a fairly well built and finished airplane. I’m really looking forward to getting a warm day to see how it flies! This is by far the largest electric I’ve ever owned and I’m looking forward to trying to trade some “electrons for altitude”!

One final assembly and initial setup note… I was surprised to see that no actual control deflection measurement are specified in the manual! To me this is clearly unacceptable. I realize that for those who purchase the BNF version, these are not needed and I’m happy to see what appears to be fairly complete instructions for those folks but what model does NOT specify control throws?? Usually for at least two “rates”.

All in all, so far I have mixed feelings about the Carbon-Z Cub.  At first, it seems like a fairly big investment for a foamie and there are a couple of small assembly issues, but… It does seem to be fairly well built and with this size wing, the option for glider tow, floats, full flaps and the chance to break into a truly large electric…   I think the value is pretty good.  Of course flying is the real goal so I’ll withhold judgement for a bit longer.

Right now I’m fairly happy with what I’m seeing and I’m looking forward to see how it performs in the air.


First flight on a Parkzone UMX B-17G

Saturday night at our local indoor fly I had the opportunity to fly the new Parkzone UMX B-17G. Here are the specs from the Horizon website:

Wingspan: 26.0 in (660mm)
Overall Length: 18.3 in (465mm)
Wing Area: 87.5 sq in (5.65 sq dm)
Flying Weight: 2.75 oz (78 g)
Motor Size: 6mm in runner (Left and RIght Rotation)
Radio: 4+ channel DSM2/DSMX transmitter required
CG (center of gravity): 38mm back from leading edge at wing root
Prop Size: 72×65 3 Blade
Speed Control : Brushed ESC (included)
Recommended Battery: 3.7V 1S 250mAh 20C LiPo Battery
Scale: 1/48th Scale
Experience Level: Intermediate
Is Assembly Required: No

e-flite U5380 Umx B-17g Flying FoRTRess

   Parkzone UMX B-17  <– Click here to view purchasing options on Amazon

The first thing you need to be aware of is that there is no steering on the tail-wheel so you need to get some forward speed quickly so that the rudder becomes effective and you can turn! Not a big issue as doing a ROG takeoff was accomplished fairly rapidly and without any real need for rudder input. The counter-rotating motors and three blade props seem to provide good power without causing any yaw that I noticed. I was flying in a gym that consists of 3 side by side basketball courts and was off the ground in about 10 feet. The B17 flies fairly slowly though I would rate it moderately fast for an indoor venue of this size. I had to apply a fair amount of down trim to keep it from nosing up but I suspect the battery could be moved a bit more forward to offset some of that. Probably 15 clicks of trim before I got level but this was not my radio so I don’t really know what the trim steps were set for (it was a DX9 I believe).

I’m fairly sure no expo or rates had been set, just a very vanilla setup. In spite of this the B-17 flew smoothly with a fairly wide speed envelope. Roll and Yaw seemed to be adequate though I did not try to do a full aileron roll, stall turns or any thing of the sort considering it was not my airplane nor did I have much room to work with. All I can really say is that it flew smoothly and turns were easily accomplished though a bit of rudder coordination seemed to make for much better turns. In a gymnasium you quickly learn to turn while maintaining altitude or you will be bouncing off the floor or dodging rafters on a frequent basis. With the help of the AS3X system, this was not very difficult. The only concern is on landing as the B-17 does what all my AS3X ships do… it wants to keep level and will attempt to do so by applying more and more elevator as you back off on throttle until the plane stalls abruptly!! This can be a bit disconcerting the first time you experience it so my advice is bring the B-17 in a bit hot to stop this from happening until you learn the stall speed of the plane at altitude. A few clicks of throttle will keep this at bay until you learn the characteristics of the plane. This seems to be an AS3X thing, not exclusive to the B-17.

All in all, the plane flies much better than such a small multi-engine like this really should! And it is really impressive how much scale detail they pack into such a small package. Flying it isn’t difficult, the intermediate rating they apply seems appropriate. I’d love to fly one outdoors to see what it can really do… I’m going to guess that basic aerobatics (more than a B-17 should be doing) are within its grasp and flying smooth and looking impressive it can certainly pull off. Wind handling will be interesting but based on other AS3X craft I’ve tried I expect a 5-10 at most would be within reason with a little practice.

It’s hard to believe that all 4 engines running at around half throttle didn’t kill the battery after 8 minutes of flight. I thought I could detect it slowing a bit at that point but it was still flying when I landed it with only a minor bump into the wall as the roll out lasted a bit longer than expected! No damage, so NO, I don’t own one yet! I do encourage you to get one though… and then let me know when you’d like me to come over and fly it for you a bit!

Blade Nano QX – Radio configuration

I’ve had the Nano for a few days now… maybe a dozen flights and I’m enjoying it very much.  Straight out of the box and with the radio configured per the instructions (Using my DX18) it is a nice flying aircraft.  However… there’s always room for improvement, right?

So here is what I’ve done to program my DX18 to help the little quad fly even better.  Here’s my list of “wants” that I came up with:

  • First of all, I wanted a throttle cut.  I consider throttle cut to be a necessary safety feature on any aircraft and on electrics especially.
  • Obviously I need a timer.  The flashing light on the Nano that signals a low battery has so far been unnoticeable for me.
  • Finally, I wanted to institute Expo and End Point adjustments in concert with the change from Stability mode and Agility mode.

With that in mind I started to do some programming on my DX18.  As I thought about what I needed, it hit me that what I really wanted was to use “flight modes”.  With the FM feature, a single switch or combination of switches can change multiple settings including end points, dual rates, expo settings and more.  I have never had a real need for FM, though in some cases it might be equivalent to or better than what I do now, but this seemed the perfect fit.  I wouldn’t want to enter the agility mode without also dropping my rates down and adding some expo and doing that all on one switch seemed ideal.  I knew there was some reason I bought this expensive radio!

The throttle cut function was easily added as was a timer… very standard and easy to do stuff.  But the next part got a bit more difficult.  The mode change (Stability or Agility) on the Nano is set to operate off of a temporary switch… in this case button “I” which is often used as the trainer switch on most radios.  I now wanted this to move to one of the 3 position toggles so that it would happen in concert with my flight mode changes.  It isn’t difficult to reassign this function (in this cast AUX1/channel 6) but when I did that I quickly realized that this was not going to work as intended.  I had thought I would have 3 flight modes.  FM1 would be stability mode with full throws and a little Expo (maybe 30%) thrown in to help me be smoother on the controls.  FM2 would be agile mode with moderate throws and a similar amount of Expo with FM3 being “crazy 3D guy” mode with full tilt throws and a much greater expo setting (maybe 70%) in order to keep things from being to touchy.  Not sure I’ll ever need that mode and maybe I’ll switch this around later to 2 Stability modes and only 1 Agile mode option but this is my desired starting point.  After adding in the “Quad” graphic the main screen shows the modes as seen here.

Here’s FM1 – Named Stability Mode


2014-11-18 20.07.37


And FM2 – Agility Mode I


2014-11-18 20.08.03


And finally FM3 – Agility Mode 2

2014-11-18 20.08.17

That all looks good but after moving the AUX1 channel to a three way toggle, a quick on-bench test immediately brought a problem to light.  The Nano wants to see a temporary Off-On-Off type of signal to change from Stability to Agile and vice versa.  Just going Off-On didn’t do anything until you came back to Off.  Imagine toggling the switch from 0 to 1 (no change in Stability mode but more throws) or moving on to 2 with lots of throw and expo but still in Stability mode… no big issue yet.  But, then going back to 0 and suddenly you’re in Agility mode but with full throws and low Expo… yikes!  For a bit I thought I was stuck… but then the DX18 came to the rescue.

The DX18 has something called a sequencer.  With the flip of single switch you can have a series of events occur.  In this case I setup the sequencer so that going from 0 to 1 (or 1 to 0) caused the Aux1 channel to move to full (step 1) and then back to start (step 2) with a delay of about a half second in each direction.  This sent the correct sequence of events just like hitting a temporary switch.  Moving from position 1 to 2 does not have an associated sequence as I’m already in Agile mode after I move from 0 to 1.  Nifty!  The only catch here is that you have to start with the switch in the correct position.  That’s not a big problem as I have a habit of having all switches pushed away from me when I power up my radio.  I found a way to help with that issue as well though.  More on that a bit later.

With that solved (it’s easy to test for this on the bench as the Nano changes its LED from blue to red when you enter Agility mode) I moved on to setting up my throws (End Points and Dual Rates) as well as my Expo settings for each mode.  With that all accomplished I did a quick trial flight and so far everything is working as planned.  Of course nothing is perfect and I started thinking that I really wanted to insure I powered up the radio in flight mode 1 and with the throttle cut engaged.

This got me to looking at another underutilized (at least by me) feature of my DX18 and that is the preflight checklist.  I immediately found this feature to be quite simple to use.  I have to say I sure wish I could edit the checklist descriptions, but I found two that are close enough that reading them will get me to thinking about these two important switch settings.  My Mode Switch is using a switch that I often use for flaps on other aircraft so the “Flap Position” checklist item works for that and the “Thro. Trim Position” gets me thinking about throttle enough to remind me to check the throttle cut switch.  Of course these check box items don’t actually check the position of those switches for you, but you can (and I did) set the radio so that it will not start sending RF until I check the boxes, and you have to do it before each flight (assuming you turned off the radio or went to another model memory in between).  At least it gives me one more chance to get it right before taking control of the Nano!  Here is the setup screen for that feature.

2014-11-18 20.08.54

And Here is what the preflight screen looks like on power up.

2014-11-18 20.05.35

Lastly another thought occurred and I went into the warning screen and made it so my radio would alarm if my throttle wasn’t at idle (or at least nearly so) and/or I wasn’t in FM1 when I start up the radio.  That’s even more foolproof than the checklist!  Here is the setting for that:

2014-11-18 20.10.58

I think this gets me “in the ballpark” as far as radio setup goes.  I’ll undoubtedly adjust my expo and dual rate settings but those are minor tweaks.  With this configuration I have checked off all of my wish list and gone a bit further on safety and initial start up settings.  So far after a couple more test flights after all this was configured I am well pleased.


Only 0ne more issue to tackle… that of visibility.  I have some ideas on that and I’ll post on that soon.  Happy hovering!