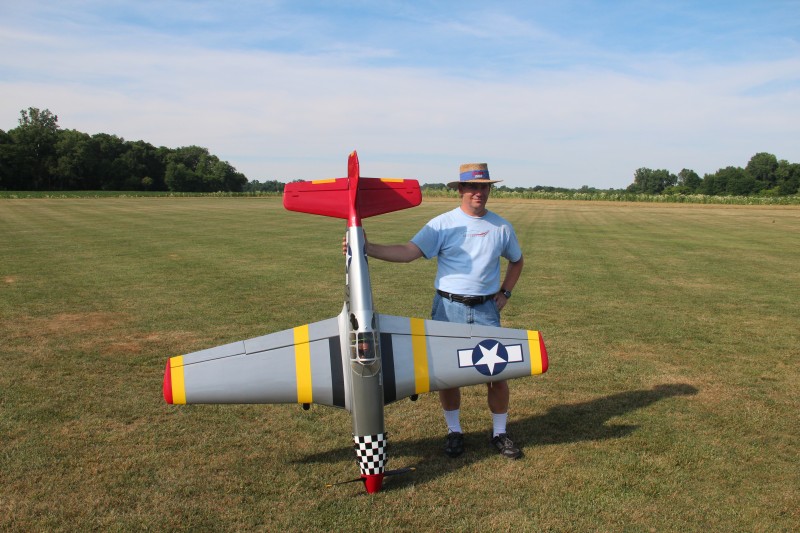
Parkzone 44″ WS T28 Trojan

I believe the ParkZone T28 Trojan is one of the best (maybe “The best”) park flyer/small field flyer/ electric/ foamy airplane built.  At least I have never flown anything that combines all the positive qualities the T28 has.  Let me try to list what I like about it here, in no particular order.

It is recognizable as a real airplane… above and beyond looking like an airplane in general, it actually captures the look of the real Trojan.

It can be flown off any reasonably maintained flying field.  Wheels work well on “most” grass fields or you can leave them behind and it flies even a bit better without the extra weight of landing gear.  Belly landings on grass don’t hurt a thing.

It has sufficient power to climb rapidly and handle winds very well.  In fact I love flying it in 10-20 mph winds.

It is reasonably rugged.  I managed to break the nose off my first T28 (on number 2 now) but abrupt dives and full throttle into the ground will do that!  Even then I could have repaired it but I decided all the accumulated nicks and cuts and dings called for replacement.

It is capable of most maneuvers one would fly “on the wing”  i.e. no hovering or other full 3D aerobatics.  But very respectable climb rates, point rolls, loops, snaps, inverted flight, knife edge and more are easily done.

Flying on floats is quite enjoyable if set up correctly…  (more on that later)

Batteries (3 cell LiPo) from 1300 to 2200mah seem to work just fine so if you fly any electrics now, you may already have some appropriately sized spare batteries.  1800s will get you anywhere from 10-18 minutes depending on how much throttle you use and how low you want to push the battery!

Parts are readily available.  I have helped to rebuild several T28s.  I think I’ve re-installed/replaced everything that makes up one of these birds at one point or another!

Without modification it is a fairly sedate and easy to fly airplane.  Bound to a high quality radio with rates, expo, mixing, etc… and some control linkage adjustments and you can make it a lot more nimble or even easier to fly as you wish.

The electronics supplied with the bird are really pretty nice.  I’ve put several hundred flights on one motor, only replaced speed controllers after dunking them in water (not recommended) and servos are adequate and inexpensive to replace.  Is a servo failure after 100+ flights a bad thing if I can get a replacement for $12+/-?  And the failure is twitching/centering… not a complete smoke job.

Can you tell the T28 is on my “Try not to be without one… buy another if crashed” list?

I mentioned flying off floats is possible.  In fact it works pretty well.  You have to find some appropriate sized floats (mine are kit built from Sig/Herr) and then modify the bird for at least one more attach point.  I installed a wood block with a groove (similar to a lot of trainers LG mounting method) and then created a mounting system from light wire that I can insert (I’ll put a picture or two here soon). With that near the nose and the main gear wires I have a solid mount mechanism that takes less than 15 minutes to accomplish.  With the stock power it will come up off the water in 10 feet or so if you setup the floats correctly.

One thing I highly recommend if you are going to fly off of water is to waterproof your speed control (I used some antenna sealant tape to enclose both ends of the speed control shrink warp) and a baggie around the receiver rubber banded around the servo leads is not a bad idea either.  Learning to fly on floats will likely involve dunking a few times so save yourself some money!  Speed controls and receivers (at least the ones I prefer) aren’t cheap!  Don’t worry about this limiting the airflow… the motor only draws about 14A the best I can tell and the controller is rated for 30.  I’ve never had issues as a result and I don’t ever take off my waterproofing for regular flying either.

Anyway, the T28 from ParkZone is a big hit as far as I’m concerned.  Anyone who can fly a trainer will have no issue with it and its still fun for those mid and upper level flyers as long as you don’t need to hover to have fun.

I would recommend the red and white “Navy” pattern as the air force gray and blue is much harder to keep a good visual orientation.  I added some 1″ wide white stripes on mine just inside of the blue wing tips to make it somewhat better but the visibility of the red and white is far superior.

A couple years ago at the Joe Nall, I was one of 72 pilots who took the T28 up for a mass fly (to show how well Spektrum radios work) so I will always have a soft spot for the T28.  Mine came back safe and sound after 9 minutes or so of very intensive flying!  About 60 of them were the stock red and white scheme (mine included) and I’m often asked how I kept track of the one I was flying.  My answer is always the same.  “Don’t ever look away from the plane… and don’t blink”!


Servo and Radio Setup – Travel and Rates

When you set up a new model on your radio using default settings, it is likely that the maximum movement of the servo is very close to 45 degrees in each direction.  This is so for several reasons but the key facts are as follows:

  • Most servos “out of the box” are made to  rotate to a maximum of around 60 degrees in each direction or 120 degrees overall.
  • The radio defaults the Travel or End Point Adjustment to a value of 100 (brands vary as to the maximum allowed, typically either 125 or 150.
  • The radio also defaults the Dual or Triple rate settings to 100 with the maximum typically being 125.

For purposes of this example I’ll use 125 as the maximum for the “Rates” and 150 as the maximum for the travel as that is what my Spektrum radio uses and that is what I have tested with.  Though the 100 value is not really 100 “percent” of anything (other than 100% of the default) most folks refer to it that way.  I feel like this creates an issue as many have trouble understanding how these functions work because they are thinking in terms of percentages and they really are not so I will just specify the value from this point on and avoid the confusing terminology.

Since the radio is set to a Travel maximum value of 100 out of a possible 150 (in each direction) the maximum rotation of the servo output shaft is 100/150 or 2/3rds of the 60 degrees max in each direction.  I.E. the servo rotates 45 degrees in each direction in this default configuration.  If we were to up the travel value to 150, we would then get the full 60 degree designed maximum rotation of the servo.  Simple enough.  This Travel setting is not commonly something assigned to a switch with the intention of changing it to allow for certain maneuvers or flying in certain conditions.  It is simply set and forgotten or never even looked at.

On the other hand a Rate switch is a commonly used setup.  Most folks will use the Rate switch to allow for lesser or greater travel as needed.  To understand how this works let’s return to the default setting for Travel (100) and adjust the rate settings only.  Let’s assume we have a dual rate switch assigned.  In position 1 it is set for a rate of 100 and at setting 2 it is set for our maximum setting of 125.  In position 1 we are at our standard default setting and the servo arm moves 45 degrees in each direction as we move the appropriate stick through the complete available motion.  When we switch to setting 2, we get a bit more travel.  As you might guess we get about 7.5 degrees more travel in each direction.  Not quite to our maximum, but half way between our default 45 and our maximum 60 degrees.

So now it gets interesting because there is some interaction between the two.  After doing some testing, here is what I found.  If you leave the Rate setting at 125 and set the Travel to 125, we can now reach our maximum of 60 degrees of motion.  Further increasing the Travel to 150 will not change (apparently) anything.  Maximum throw is still at the same 60 degrees.  But beware!  There is something a bit less obvious going on.  The motion is smooth and continuous with both set to 125 or with the Travel set to 150 and the Rate set to 100, but when you set both to maximum a “dead spot” is created at the high end of stick motion!!  The last 25% or so of stick motion results in no movement at the servo.  What is apparently happening is that the radio has interpreted the combination of settings such that the maximum output is reached before we run out of stick motion.  I can’t imagine why this would ever be a desirable outcome.  I would suggest that you either choose to limit your maximum Travel to 125 and use the Rate setting to reach the maximum travel, or limit your Rate setting to 100 and use the full Travel setting range as desired.


Servo Linkage changes – follow up

During my recent posting about making servo linkage adjustments on my Slick, I found I had set the standard rate on the elevator to 33.  This accomplished what I needed to do at the time, limiting my throw so that the Slick wouldn’t snap without full or nearly full application of elevator stick input but I wanted to get more out of my servo so I shortened the arm and managed to get the setting up to 66.

(you can read about that here: WH Slick Linkage Changes)

That was all to the good, but should I try to get more?  How much of my precision am I giving up?  If I did want to get more throw in the future, how much more could I get without reversing these changes?

First of all I’ll look at precision.  Here’s how the math works out.  If my servo is capable of 2048 steps and I only get all of those steps when I have maximum throw (60 degrees in each direction) then my setting of 33 in my Rates combined with my Travel setting defaulted to 100 was really limiting the precision that both the servo and radio are capable of!  I was limiting my commands to a maximum of 2/3rds (45 degrees versus 60) of the original steps because of my Travel setting and then limiting it to use only 1/3rd of that possible throw.  If my math is any good, I was using maybe 22% or 450 of the available 2048 steps.  With my new configuration I still have the 100 Travel setting but I’m now using 2/3rds of those available steps which doubles the available steps to about 900.  Hopefully this allows for more precision and less “slop” in the system.  I am covering the same distance with twice the precision and that should result in more precise control and more exact centering.  Even more of these changes (shorter servo arms and/or longer control horns) may be in the future but I’d like to do a bit of test flying before making more changes.  For now I think this will be more than adequate.  I hadn’t really noticed any elevator slop or lack of precision during past flights, but with many of these adjustments it can often be a case of not realizing what you were missing!

Finally, let’s look at travel.  I know that my new setup gets me about 27 degrees of rotation at the servo and a little over 10 degrees or 3/4″ of motion at the elevator itself.  This is slightly less than half of the available 60 degrees of rotation so I should be able to slightly more than double the existing throw if I should ever decide to do so.  While 20 degrees or 1.5″ of travel isn’t what most 3D guys would consider huge, it’s far more than I will likely need for flying IMAC style precision aerobatics.

Based on these observations I certainly can continue down this path a bit farther but that decision will be based largely on actual flight testing.  At this point that means waiting on some favorable weather.


Aeroworks Extra 260 Electric

 My Aeroworks Extra 260 EP-3D ready to fly… not much more than a static model at this point!

This is my AW Extra 260.  Vital stats as follows:

  • Power is a Super Tigre Electric 400 Speed 950kV with an APC 10×4.7
  • Weight 14-15 ounces with battery
  • Battery is a 3 cell Thunder Power 1350 3S LiPo rated at 25C
  • Speed Control is Castle Creations Pheonix 25
  • Servos are all E-flight S75s
  • Radio gear is a Spektrum DX8 and 6 channel Orange RX and JR remote DSM2 system

I created the motor mount (just a light aluminum plate with some holes drilled) as I didn’t want to spend the $80 for the motor that was recommended and this one (at around $20) used a Y shaped bolt pattern as opposed to X-mount that was provided for the high dollar motor so modification was in order.  At this point “flying” has been limited to hold it pointed to the ceiling in the garage and throttle up until I can let it go and quickly grab it again before it wants to hit the ceiling.  That is seemingly happening with about 50-60% throttle so power won’t be an issue.

The last few days have ranged from 15 above to a few degrees below (Fahrenheit) and I am fond of 75 degrees, sunny and no wind so it will likely be a few weeks before it gets a proper test flight!

Well in all honesty I did fly it once early on with an over sized battery (hard to find anything large enough that fits the slot cut for it) right before the cold winter weather set in but that was limited to just confirming it flew, nothing fell off and everything responded to control inputs properly.  It was to windy and cool to make a proper assessment that day so while nothing catastrophic to report I can’t say if it flies well or not yet.

I may move it over to a new Spektrum 4 channel receiver before my next chance to fly.  Dropping the remote will save a bit of weight and I’d rather have a Spektrum brand receiver than a knock off anyway.  I’ll feel more confident about flying it way out and up and with the new receivers being only $30 or so I don’t mind paying for the Spektrum name.  Besides I’m only using 4 channels and this way I can get closer to having all of my fleet on DSMX.


Parkzone Mini Vapor – lesser relation to the Night Vapor

IMG_3010

The PZ Mini Vapor – A bit less than the Night Vapor in almost every way

I have so much fun flying my Night Vapor that when the Mini was announced I went to my local hobby shop and put one on back order.  It was a few weeks before it became available but it came in shortly after we fired up the indoor season in these parts so all worked out well enough.

I took the Mini out of the box as soon as I arrived home, took a best guess as to battery placement and quickly shut off the ceiling fans.  A short take-off run down the kitchen island and I was flying… sort of.  OK, so balance was a wee bit nose heavy and it took a few seconds to remember that I had forgotten to do my usual rudder to aileron mix (the rudder is set up to respond to aileron input… which is fine when your expecting it!).  Luckily, the wall is 4 feet away from the kitchen island/runway and not 3!  Once I got the balance straightened out and the mix set up, I was back in the air and decided flying in my living room was probably not a fair place to test out this little airplane.  It seemed a bit quicker than I had imagined and the living room walls seemed to come up quick!  Maybe after a few trim flights in the gym and I could be happily tooling around in my living room like in the video!

So for the next couple indoor flying sessions I did some trimming and balance tests and flew with the stock battery (30mah I think) as well as the 70mah from the Night Vapor.  In the long run, what I figured out was that the Mini Vapor just isn’t (for me at least) up to speed compared to the Night Vapor.  I can fly the Night Vapor in the same space and at the same apparent minimum speed as the Mini.  Also, the Mini doesn’t seem to have quite the power to weight ratio as the Night Vapor… loops are harder to do, max climb is a bit slower and as one would expect, at 1/3rd the weight, the Mini can’t handle wind at all.

So is the mini such a terrible little plane?  Not at all.  It’s a nice little plane in it’s own right and capable of flying in a small space with some practice.  Just the fact that we can go out and pick up a production airplane that is so small and light and flies this well is pretty amazing.  It just isn’t what I wanted and expected.  I’ll still fly it (in the gym) but probably only when the Night Vapor batteries are all on charge!

Parkzone Ultra Micro J3 Cub

IMG_3007

My ParkZone J3 Cub with Prop/Save and Wheels from RC Funlab

This was my ParkZone Cub.  I recently passed it on to a fellow flyer who simply enjoyed it so much I gave it to him!  A month or so ago at one of the indoor flight sessions I let him have a couple flights with it and he immediately started doing touch and go passes and just generally running around in ovals and having a ball.  He’s the younger brother to one of our best young 3D fliers at my home club (Indy RC Modelers) and he’s had a few little indoor planes so I knew he would have no trouble with it.  When I got home I realized that I had done pretty much all I ever wanted to do with it.  I didn’t need it any more so I fixed up a minor crack that it had earned that night and boxed it up until I saw the young man again.

I was originally attracted to the petite little Cub because it’s a pretty decent looking semi-scale bird…. considering it’s an indoor electric molded from foam!  With some panel lines, a fake engine and with the edition of some “sorta-tundra” tires it looked and flew pretty nice.  My only immediate disappointment was I actually expected it to fly a bit slower.  Isn’t that how Cubs fly?  It seems to need a bit more speed than I would have expected but I adapted to that fairly quickly.  I enjoyed it for a while but over time I realized it flew…. well… like a Cub!  Actually like a model Cub, which is to say stable with better than scale power but limited to the normal things that a 3 channel, micro electric can do.

Over the course of 6 months or so I got a bit bored and soon gravitated toward other, more interesting airframes like the Night Vapor and SBach. The Cub only got flown when nothing else was available or conditions were such that I wanted to fly something “disposable”.  It just wasn’t all that much fun for me anymore.  Don’t misunderstand, I had my fun and felt like I got my money out of it.  It’s still one of the better looking examples I’ve seen and my young flying buddy sports a big smile when he is at the controls.

In summary, I would recommend the Cub as long as you understand what you are getting.  This is not a plane to fly in the house and of course outdoors in mild wind is OK but no more.  Maneuverability and power are reasonable but this is obviously no aerobat!

I would suggest the prop saver option as these are well known for breaking prop shafts (right at the back edge of the prop so you have to replace prop and shaft!) in the case of any nose down landing.  Otherwise, it’s a quality little airplane right out of the box.


Parkzone Night Vapor… Indoor or light wind flyer

IMG_3014

My Night Vapor – showing some wear and tear but still flying great.

The Night Vapor is a sub-one ounce, 3 channel indoor flyer from Parkzone.  I’ve been flying one for about a year and a half and probably have 150 flights on this little aircraft.  I think it is one of the best values in RC, at least for those who are flying DSM2 or DSMX radios.  I bought mine Bind N Fly and have flown it on the JR x9303 as well as (most recently) my Spektrum DX8 and have great fun every time.

The Vapor has a fairly large flight envelope, ranging from medium-slow to extremely slow high alpha, almost hover, which can be sustained for as long as you feel like holding the elevator back and correcting ever so slightly with the rudder (even if it is on the aileron stick) and some very mild jockeying with the throttle.  Fast it will never be, at least in level flight and I don’t recommend high throttle dives.  If you try to go fast, be aware that there seems to be some tendency to warp the wing/tail and everything else in a full throttle dive that may result in some unintended maneuvers.  Buy this plane to go slow and enjoy exploring the low end of the envelope… that is where this bird shines.  Low wind… maybe up to a bit less than 10mph??? is OK but in a gym with no wind or blowers on at all is ideal.

In the gym, doing carrier landings on a standard 6′ table, using the same table as a limbo or even tempting the gods with some “through the rafter” flying is all very possible and a heck of a lot of fun… just don’t expect anyone to climb up there or come up with a cherry picker to retrieve your airplane!

A few tips based on my experience with the Night Vapor.  Once you figure out the proper location of the battery for balance (the whole carrier slides on the fuselage “stick” for adjustment) and get accustomed to the flight envelope of the normal setup you are ready to make a few adjustments to get the most out of this airplane.  That should take about 4 flights as the Night Vapor is really easy to fly, but take 10… it’s all fun!  Save the full throttle setting for fast climbs, loops and the like and stick with the 70mah battery for a while so the balance is consistent and the airplane remains light.  Slow and light is where she shines.

Assuming you have a better transmitter than the little “video game controller” quality that comes with the RTF model (Not saying they aren’t usable but they don’t have the features I’d like) go back and make a few adjustments.  First, move the linkages in on the control surfaces as far as they will go to get maximum throws available.  Then go into the radio and put in appropriate endpoints so that the elevator and rudder can’t bind together when both are at extreme throws.  Add some expo or at least some dual rates and start experimenting.  What looks a lot like a flat spin, the aforementioned “near” hover, tight loops and other interesting maneuvers become much easier at this point.  Try bigger batteries like a 120mah for longer flights but expect to give up just a little vertical and of course low speed, high alpha takes a bit more throttle.  I prefer to stick with the 70mah and 12-15 minute flights are easily attained with it so I see no point in anything larger unless it’s all you have handy!

Finally, you may have noticed this bird has lights on it for night flying!!  I would recommend you get used to day flying first as trying to get used to a new airplane AND trying to stay oriented would be a bit challenging… please don’t ask how I know.  Once you are comfortable this is just about the best thing every built for cruising around the night sky, (not too far away) making touch and goes off the top of your camper or other nearby “landing strip” and just generally having a good time out of doors after the sun goes down.

In my book, the Night Vapor is an airplane I would likely replace immediately if something untoward occurred.  Of the 14 or so flyable airplanes I own… few fit in that category.

Parkzone UMS Sbach 342 3D

IMG_3012

My Sbach – A fast but stable aerobat thanks to AS3X

I’ve had the little E-flight AS3X equipped Sbach for a couple months now and the first thing I’ll say is it isn’t what I’d consider a great indoor plane. It seems to fly better fast and I personally don’t enjoy spending all my time just “missing the walls”! However the stabilization system really makes it fly more like a larger model… Maybe akin to what you’d expect from a 40-60 power model. It’s quite impressive. Though I’m not much of a 3D enthusiast I have been trying out hovering a bit with it and it seems to be doable as power is not a problem.

As an outdoor airplane it flys very well with sustained knife edge, (use the side force generators from the beginning) crisp feeling 4 point rolls, loops small or large, stall turns, snaps and more within its repertoire. Landing takes a bit of work as it needs to carry a bit of speed for anything resembling a normal landing. The best thing is it can do all that in 10 to perhaps 15 mph winds if you remember to correct your flight line with judicious use of rudder! That’s impressive for a sub 3 ounce aircraft.

All in all, I enjoy the little Sbach. While the AS3X system does make for some seeming “resistance” to smaller control inputs, it also makes the plane track great even in high winds that other micros can’t handle. Flights don’t seem to be to short so the little 180 mah battery seems to be about right. It’s unfortunate it has a different connector than anything else I’ve owned before, there is a little adapter cable from horizon that adapts it to most balancing chargers so if you don’t get the model with the charger or want another option there is a fix out there.