
I have recently spent some time actually starting and finishing (a new concept for me sometimes) a few projects that I had started or at least planned on starting for a while. One of them was to build something out of the various Radian parts I had aquired over the course of the last couple years. I have had a replacement body for the Radian (just the foam) for a couple years and a pair of wings from my original Radian as well as having aquired a horizontal stab, and rudder. What I didn’t have was a motor, nose cone and prop. Nor did I have replacement servos, push rods etc… Well not the exact original equipment anyway.
What spurred me to make use of all I had accumulated was actually the crash of a UMX A10 that I owned. I know that may sound strange but hold that judgement just a bit longer, please. Here’s the story…
I was recently flying at a local indoor event and wanted to at least get a test flight on my UMX A10 which had some minor damage I had recently repaired. When the opportunity arose I taxid out and started my takeoff roll when suddenly a small Cessna materialized just a few feet in front of my airplane. (Finally proof that Star Trek transporter technology does exist!!) My perhaps ill timed reaction was to stay in the throttle and pull full back on the elevator. This resulted in the A10 clearing the other airplane but left it nose straight up and quickly approaching the ceiling. Not familiar with the flight regime of the A10 I quickly cut throttle and pushed the nose down to get control. Unfortunately this was extremely effective in arresting my altitude gain but soon found the nose of my A10 impacting the gym floor with the entire weight and speed of the airplane behind it… there was not much left forward of the wing.
As a friend and I started sorting through the wreckage back in my shop later that day a particular part of the dimunitive A10 caught my eye and I started wondering what airplane I could mount the dual ducted fans on??
I went through several options in my mind before I remembered the pile of glider parts I had in the corner. Thus began the new project.
I first started assessing what all I would need to make my fevered dream a reality. I have enough small servos laying about. A small receiver wasn’t a problem either and I have enough odd hardware laying around that control rods, horns and all the rest of the miscellaneous hardware shouldn’t be a big issue either. That only really left a canopy and some sort of nose cone plus a way to mount the EDF pod onto the glider.
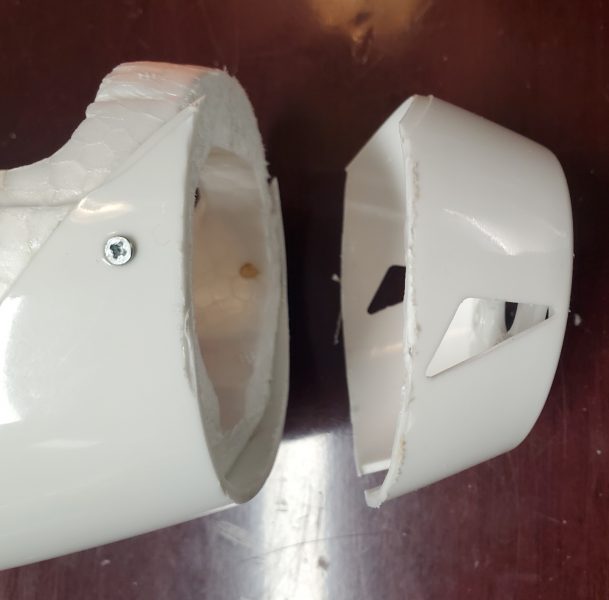
I first tackled the nose cone. Because the original motor on the radian is tilted both right and down, the front of the Radian is not at all straight so just putting an empty spinner (for instance) was not going to look very good. To fix that issue I simply eyeballed a line more perpendicular to the thrust line of the craft and sliced a small portion off the nose to give me a better starting point.
I then did some measurements and jumped on Tinkercad to design a new nose for the Radian. I had to make it a bit oblong as the nose is a bit taller than it is wide but I managed to create something that looked workable.
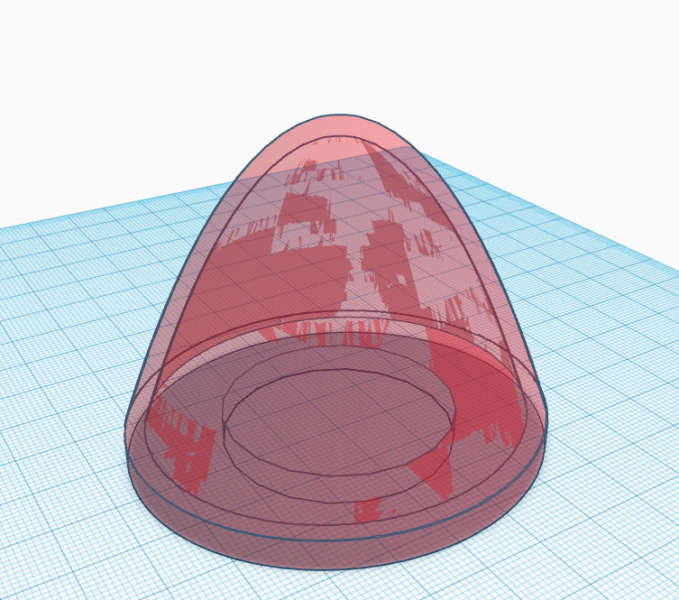
I integrated a base plate with an opening in case I needed weight or perhaps a good antenna location (?) and then glued it onto the front.
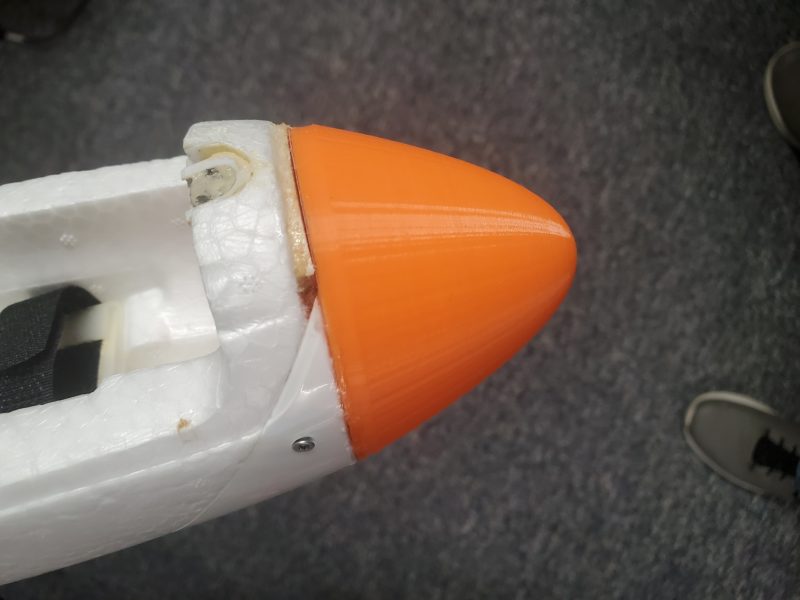
I had to add a small shim at the top to lend some strength to the forward part of the foam where the canopy attaches via magnet and it at least looks now like it should work. At least now I have something aerodynamic to lead the way.
Next I did all the normal stuff you’d have to do to assemble one of the less complete ARFs you might have worked on… mounted the servos, built linkage, attached the rudder elevator and generally assembled the airplane. After that I had everything ready except attaching the wings and the aforementioned EDF power pod donated by my UMX A10. I decided to attach the wings and consider exactly where to add the “power pod” when I realized a problem. The wings I had were from an original Radian but the body was from a Radian Pro… The issue there is that the Pro used a completely different wing attachment method. While the radian used a wing tube and interlocking tabs on the wing roots, the pro used a plastic insert with tabs that projected out from the body, inset into the wing bottom surface and bolts into the wings to hold them in place. Time to do some more modification!
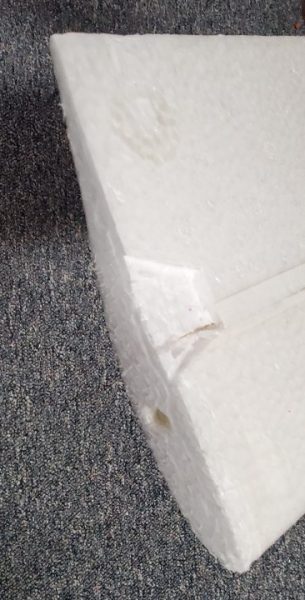
First I took a straight edge and marked a line at a right angle to the trailing edge, just far enough outboard to eliminate the slightly enlarged wing root area and interlocking tabs that were no longer needed.

Then it was time to get out the razor knife and eliminate the problem. I also had to carve a slot in the bottom surface of the wing to clear the projecting tabs. This actually seemed to work out even better than expected.
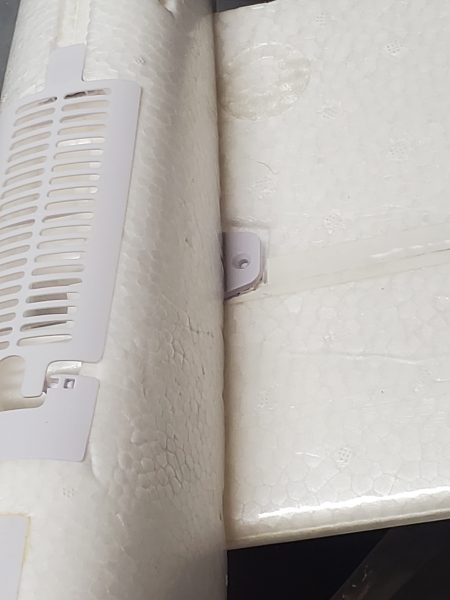
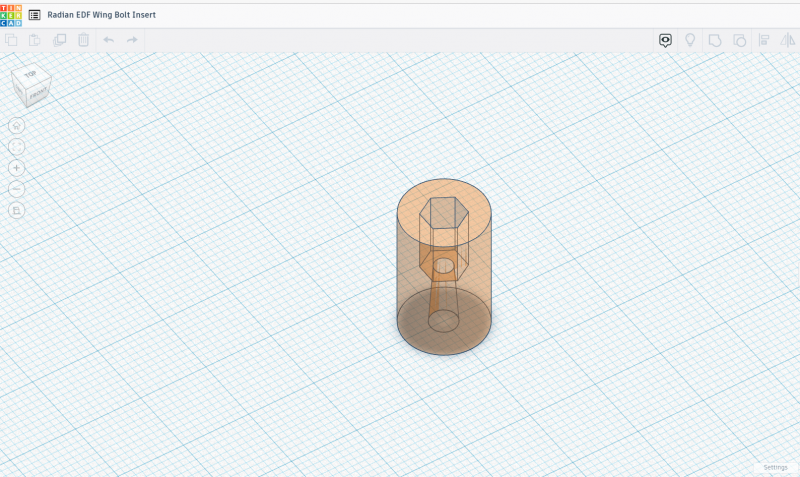
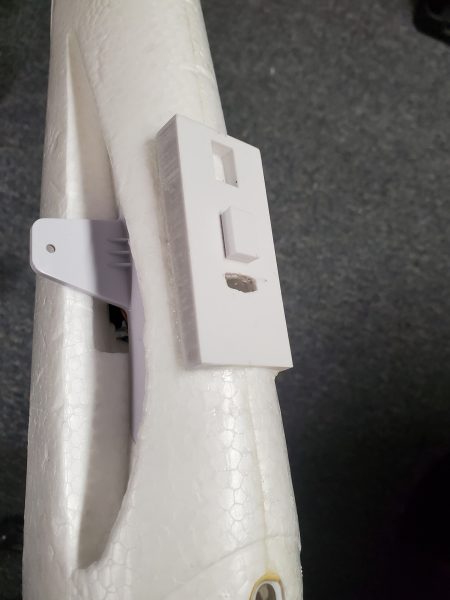
Next I went back to Tinkercad nad created an insert I could put in the wing so that I’d have something for a bolt to thread into to keep the wings in place for those blistering high speed passes (not). I incorporated a hex inset into the piece so a nut could be captured in the piece and also so that my bolt would not have to be very long. I also included a small taper to help the bolt insert easily but line up with the nut so that a cross thread is unlikely. My dimensions proved to be a bit tighter than anticipated so I had to drill out the hole just a tad to allow clearance for the bolt to go through. On the hex end this actually worked to my advantage as the nut was such a snug fit it would be very difficult to remove once inserted. Here’s the design.
After cutting an appropriate sized hole and then gluing in the insert this seems to work pretty well. One other minor issue was since I had shortened the wings a bit I had to also trim the carbon wing tube a similar amount to allow the wings to seat properly.
The next item on the list was to actually mount the EDF pod onto the now mutant Radian. I realized that having eliminated the normally nose mounted motor and prop, the airplane was likely to be tail heavy. I also considered that I would have to run wiring back to the motors if I put them back on the tail area ala the A10 or DC-9 type aircraft so I quickly abandoned that idea and decided that having the motors up near the balance point and placed for easy pass through of the wiring straight down into the aft compartment beneath the wing made more sense.
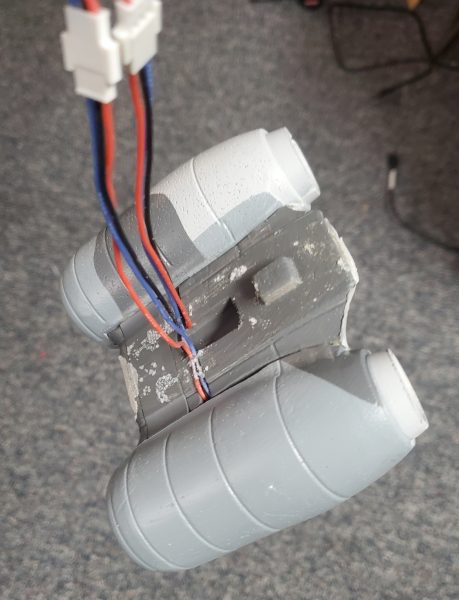
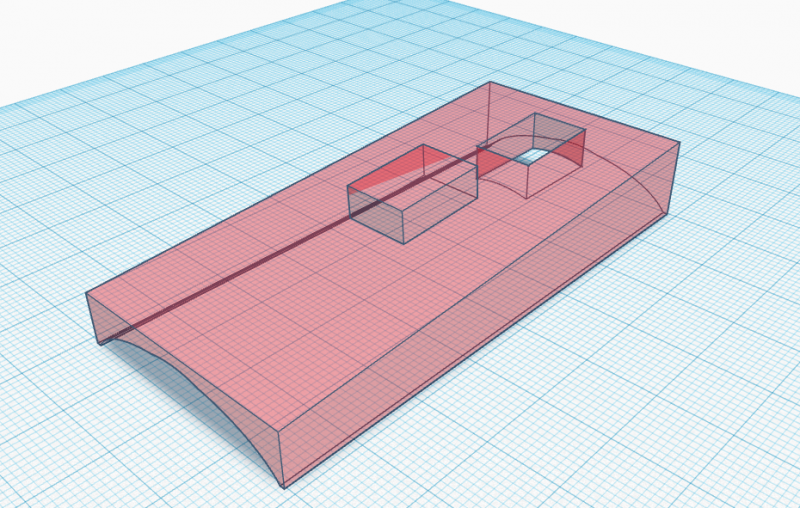
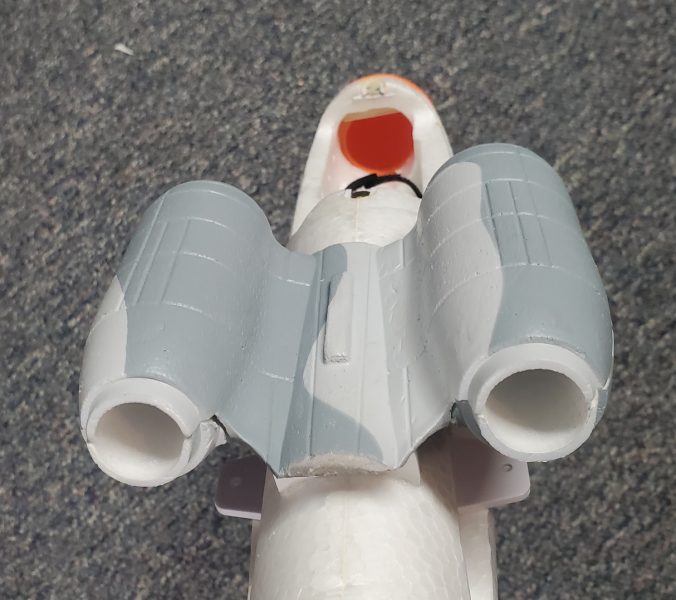
The engine pod has a tab and a matching hole where a tab was inserted into it when it was connected to the A10. At first I thought about just cutting a matching hole for the tab into the top of the Radian and mounting the pod directly but that created a couple issues. The pod would be tilted fairly drastically downward at the rear of the nacelles which would impart a fair amount of up or down thrust depending on how that thrust affected the airplane… its beyond me to figure out which. And it would also likely bring the nacelle into contact with the wing. So to hopefully eliminated these issues I needed to align the pod with the thrustline of the Radian. I also wanted to make use of the tabs and the maxium surface area available to mount the pod onto the convex shape of the top of the glider to be sure it stayed put. So back to Tinkercad I went, to create an adapter plate to mount the pod effectively. As you can see from the image below, I had to capture something close to the curve of the top of the glider whilst generating a slope to offset the tapering of the body so that the pod would end up (hopefully) only providing motive power and not pushing the glider nose up or down.
It took a couple tries to get the curve to (almost) fit the top of the glider and to come up with the slope I wanted to get the thrust line I was trying to reach but eventually I called it close enough and did a final print.
I later realized I needed a pass through hole for the wiring as well but a dremel bit took care of that quickly! I created a similar pass through from the top of the aircraft down to the electronics bay so I could route the engine wires down to the speed controllers below.
Here’s the finished piece in place on the top of the Radian body and then with the pod attached.
At this point I started hunting around for a canopy replacement which apparently are made of “unobtainium” as there are no spares available anymore. Luckily a nearby RCer that is friends with one of my flying buddies came up with one off of a Night Radian and it seems to fit just fine… It might be just a bit loose so I’ll probably just wrap a rubber band around it for the first flight or two while the shakedown gets done and find a way to improve the hold on that once I decide if the plane is going to even fly reliably or repeatedly!
At this point it was just a matter of installing and connecting all the electronics, servos and linkages, etc… and we should have something flyable. I won’t bother with much detail for this part of the build as it was all pretty standard. I ordered a couple of inexpensive speed controllers (I’ve pulled red wire from one of the plugs to the receiver from 1 speed controller so I power the flight systems off the BEC circuit from only one of the ESCs) and used a 6 channel DSMx capable Spektrum receiver that had 1 remote so I could get some antenna diversity but that was about the only things of any note.
Next I checked balance to see what Of course it was way tail heavy so I kept increasing the battery size I used. I ended up with a pair of 2c 2200mah batteries as far forward as I can get and the balance is about right. That is only 4400/800 = 5.5 times the capacity of what was in the A10. Considering this is a glider and will fly with power off at least 50% of the time (I hope) and I’m estimating I can fly for approximately “all day” with these batteries!!
I’ll post an update after I get a flight or two on this Frankenstein monster with parts from:
- Original 2M Radian (Wings)
- Radian Pro (Body)
- Night Radian (Canopy)
- UMX A10 (Motors/Nacelles)
- 1.2M T28 (Servos)
Plus a pair of new speed controllers, custom designed and 3D printed parts, and a selection of rods/linkages etc… from stock I had in the shop. After some additional nomenclature added, she looks like this:
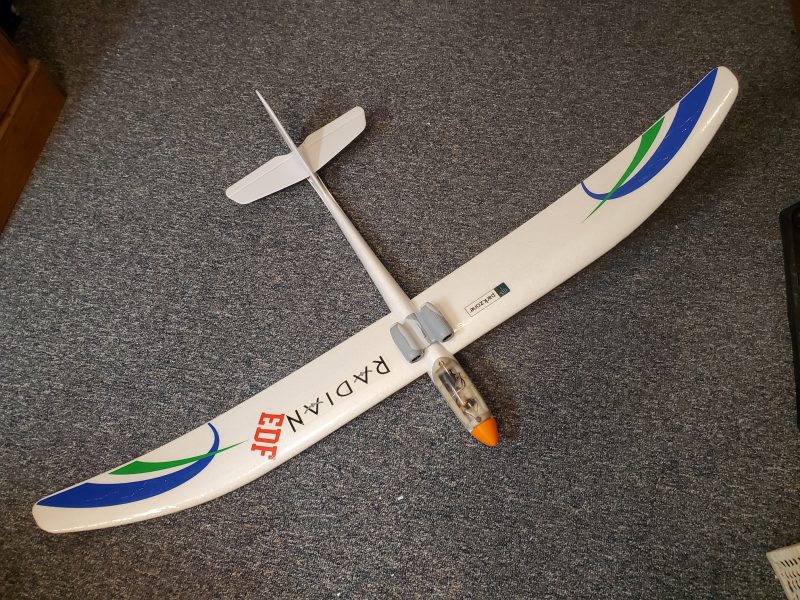
I’ve christened her the Radian EDF and I’m really looking forward to flying her at the upcoming EDF event at my local club field. Pretty certain no one else will have one there!