So with my move to bigger E-powered aircraft I have started buying larger packs (mostly in the 6S 3000-5000 range. These things can easily cost $100-200 and for that kind of investment I wanted to get something that would both perform well and would have a minimum cost in terms of how long the packs would continue to work. This lead me to a lot of reading and research on internal resistance, C ratings, and care and feeding of batteries… there’s plenty to discuss about all that but for now I will just cut to my understanding.
First and foremost, C ratings on batteries are almost pure marketing. What most people understand that number to mean… that you can safely draw this number multiplied by the pack capacity until the pack is drained without damage to the battery pack … is apparently NOT what most of the sellers understand. To be charitable, I would assume they are expressing a number that can only be reached by testing to destruction (in some cases, a very quick and fiery destruction). In my more pessimistic language, I would say the C ratings advertised are pure bullshit. Not only will many of these packs not sustain that level of current draw for the amount of time it would take to discharge the pack, but some of them are so ridiculously labeled that the wires would simply melt, the connector would disintegrate and then whatever was in proximity of the pack would likely burst into flames from the heat generated in the pack if you tried. The consensus among those who have done independent testing seems to be that no LiPo available to us should be labeled above 35-40C continuous. 70C is a cruel prank… 150C is pure snake oil. I can and probably will write a whole other post or two on this but for now that is all I will say about the C ratings in this post.
Internal resistance (IR) is a much less understood but much more important and useful rating but it is not typically a published specification for most hobby grade batteries. It is temperature and capacity dependent but is still a very useful tool in comparing batteries and could easily be published as a number of milli-ohms at a certain temperature. Some folks have suggested a calculated value called FOM or figure of merit which would take into account both the IR at some standardized temperature as well as factor in the battery capacity. It isn’t perfect, but it would be a much more useful specification than the C ratings published now. Of course it could be “exaggerated” just like C ratings are but measuring the internal resistance of a battery can easily be done with a few available tools and the FOM can thus be calculated so it would be much easier for hobbyists to spot these exaggerations and react accordingly. Hopefully the market could then sort it out… but I digress. The reason IR is so much more useful is simple. IR is directly related to the current allowed to flow from the battery pack and the amount of heat generated from the battery supplying the current. Though IR is not the only factor that affects a batteries overall health and ability to provide power to the attached circuit (primarily your motor!) it is probably the most easily understood and has the most direct correlation with these things. I will likely post more on this later but for now what follows are the basics.
Generally speaking, lower IR is better. Keep in mind that if you measure IR, you must do so at a constant temperature to be useful for comparison and also keep in mind that only like capacity batteries can be compared. The relationship between cell size and IR is not linear so no simple way to compare between two different capacity packs is available. The total IR of a series pack is the sum of the IR of each cell. This total number is indicative of the current that the Battery can produce overall because the battery IR will cause a voltage drop as the current flows out of the battery. A battery with a higher overall IR will supply less voltage under load (the loss being “used” to heat the battery). This results in less power from the battery reaching the motor, which is the real purpose of the whole exercise! While overall pack IR is important, having each cell in a pack with a similar measurement is equally important. Having all the cells in a pack with a similar IR indicates a pack that is well balanced and matched and will therefore likely have a longer life. The reasoning is that every cell will heat up in direct relationship to the IR of that cell and since excessive heat is typically the cause of battery failure, the cell with the highest IR will be first in line to be damaged from the heat thus produced. The overheating will likely cause the cell to develop an even higher IR over time which will just add to the issue until the cell IR reaches such a high value as to render the pack useless due to the large voltage drop in this weak link or the cell simply fails from the heat. There are tools available to make this measurement both for the pack as well as each cell and published values and calculations available as a guideline to what is considered to be “good” and how much current you can really expect to draw without damaging the battery so you don’t have to totally re-invent the wheel here either. If you want to learn more, do some web searches or check in for my further posts on the subject. If you don’t care that much and just want to know what to buy I will give you some guidance based on my experience a bit later in this post. If you’d like to measure IR in your packs for yourself so you can start to recognize the good from the bad and become a more informed consumer one of the best tools I have found to do so is available here:
With this device you can measure and compare the IR of each of your LiPo packs. It will help identify which packs are best used for high current draw versus more routine use and with this an a little math determine how much current is safe to draw from this pack (there is even a webpage that you can enter the result into and get a calculated max draw). There are several different models so make sure you pick the correct one for your needs. There are some chargers available that can give you a similar reading but do some research to see if the charger you are considering gives a useful reading. My research indicates this meter is better than any of the chargers but there are a few chargers that may be good enough for your purposes.
One thing you can do immediately and without spending much/any money is to learn to care for you LiPo batteries correctly. Care and feeding of LiPos is actually pretty simple. Avoid physical abuse (punctures or compression may cause a fire). Always balance charge your packs with a charger that is made for the task at an appropriate rate (1C when possible for longer life, even if the battery says you can go faster). Don’t discharge them to fast or to far if you can help it (85% discharge is a nice goal). Store your packs at a 40-50% charge level and in a cool/dry place (the fridge is almost perfect but you will need to watch out for condensation and allow them to warm before use) whenever you can. Avoid extreme heat and extreme cold pretty much always.
Other than the physical abuse and charging rules you can violate just about any of the other rules with the understanding that you are taking a bite out of the life of your battery and sooner or later you will pay for it!
For now suffice it to say that I own a single E-Flite 6S 3200mah 30C pack that I bought with my Carbon Cub…, a G-Force 6S 3700mah 45C pack, and 4 Glacier brand 6S packs in 30C rating. 2 each of the 3300mah and 4000mah variety. Here are my feelings on each based only on my personal experience.
The E-Flite is a mediocre pack that I believe would be destroyed if asked to deliver the 96 amps it advertises for any length of time. It does fine in the Carbon Cub which only draws a max of 70A on occasion and for very brief intervals, but I wouldn’t try to pull more than about 60A from it for a sustained period. (Just in case you’re wondering, that means the battery is about a 20 C pack or at bit less if you subscribe to my definition of C ratings as expressed earlier). The cells do not seem to be exceptionally well balanced (IR varies quite a bit between cells in the same pack). In short this pack simply doesn’t measure up. I don’t consider it a terrible battery, just not a good value. There are many packs out there that are as good or better for at least 30% less… I will say the folks at Horizon (who sell this pack) have great customer support so I would be confident that they would take care of me if a quick failure occurred.
The G-Force pack is somewhat similar in that it is more than adequate for the Cub but it’s ability to deliver current I would estimate to be far below (half or so?) the C rating posted on the label. The difference is that the G-Force is significantly less expensive so it is a little easier to swallow the limitations. It is also quite a bit better balanced from cell to cell than the E-Flite pack. I have flown it in both the Carbon Z and my Aeroworks Extra 260 powered with an E-Flite power 60 motor and found it adequate in both. I don’t know what kind of warranty service I would get from the manufacturer/reseller, so it is hard to give a solid final opinion. Overall I wouldn’t rush out to buy more at this point but at least it is more reasonably priced and compared to the E-Flite is a better value.
The 4 Glaciers are my favorites so far as they are some of the cheaper packs I have purchased and yet outperform (provide all the needed current and barely get warm!) my other packs and purportedly are as good as the best out there. They certainly test out as excellent when I use my own internal resistance meter and according to my calculations they are the only batteries I have any personal experience with that might actually be able to sustain the rate that is implied by the label. In addition the balance (measured IR) between cells is very close. All this and they are in the same price range if not cheaper than the G-Force packs mentioned above.
Here’s a link to the web page where you can find these packs… Buddy RC
I have also had some limited exposure to Admiral and Thunder Power Packs in this range and the Admirals seem to to be on a par with most of the other packs out there and are in that same average price range. The Thunder Powers I have experience with have been disappointing so far. I am withholding final judgement as I have not had a chance to test a new TP pack in this range but the used ones I have played with have not measured up. The price on them is premium and while I have always heard good performance reviews, my measurements and experience with some slightly used 70C (hah) 4400s gives me the impression that the 30C Glaciers are just as good if not better. I do know from second hand reports that the TP folks will take care of their customers but that excellent service comes at a very steep price. I’d love to say it’s worth it… If I have the opportunity to test some new packs I’ll be happy to report back but right now they won’t be getting any money from me.
On to some other concerns that I think are worth noting. Firstly, you obviously want to make sure whatever you buy will physically fit and isn’t so heavy as to cause an issue. In smaller planes, weight can be critical, so take this into account but for what I fly I haven’t seen a huge or at least unexpected difference. Sure the Carbon Z Cub doesn’t have quite the straight up pull with a standard 4000mah pack as it does with a 3200… you do give up something for that weight. But it’s still pretty spritely and it can fly for 15 minutes on the 4000 versus about 10 on the 3200. One thing the C rating is good for is it seems that higher C rated cells tend to be heavier, so keep that in mind.
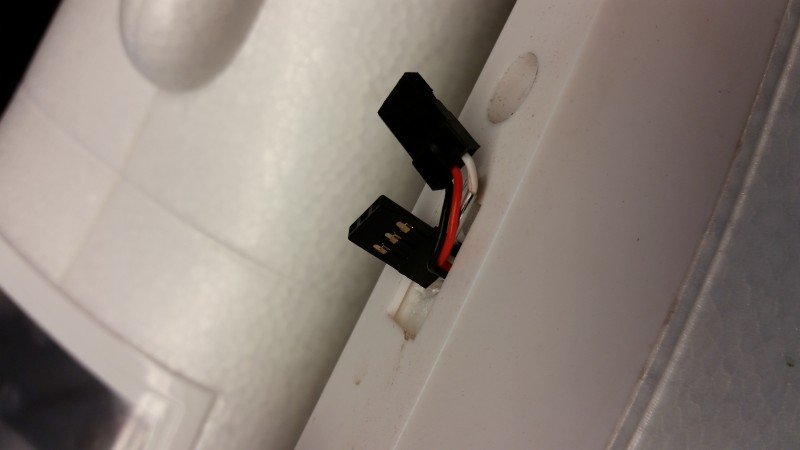
Second, take a good look at the gauge and type of wire being used to build these battery packs before you purchase. I can tell you that if the balance leads are not very flexible, they are likely to break off at some point and now you have a potentially dangerous (to your personal property as well as your health) problem. That loose wire can contact another terminal of the battery and cause a short or simply cause the charging of that cell to fail. Next stop is a forced landing in a bad place or worse. At a minimum you will be trying to repair that connection very soon and that means some fairly demanding dis-assembly and re-assembly of the pack. It is not a task I would recommend to anyone who isn’t both knowledgeable of pack construction and fairly experienced with a soldering iron. The main leads need to be both flexible and heavy enough to handle the current load as well. The gauge of the wire is usually adequate in my experience but I have run across some that were made from very stiff wire which makes them difficult to connect and position properly in the aircraft.
Lastly, pay attention to the balance and load connectors on any pack you consider purchasing. Of course it has to work with your charger and speed controller or you will need to adapt it to fit. I don’t like using adapters on the load connector (in flight) as they just add another voltage drop and possible failure point so can affect both longevity of the model and performance. I eventually will swap out whatever comes on the battery for whatever I deem appropriate for my use. I am currently using some JST 2 pin (red) connectors on my smallest aircraft, Deans ultras on my mid size birds and EC-3s almost exclusively on my larger aircraft.
 2 Pin Red JSTs |

Deans Ultra

EC-3
The EC-3s are reasonably easy to assemble, make a good secure connection and are rated at 60 amps of continuous current flow. So far I have only seen 70-75A for very short periods on my larger craft so these seem to be quite adequate. Many folks favor the Deans, but they are only rated at 40A continuous and I find they become difficult to get soldered to 10 gauge wire without melting the housing and just about impossible on anything larger. They work well for 12 gauge and smaller wire and I use them almost exclusively on my 3S powered craft where smaller wire and ~30A draws are more the rule.
On the balance connector pretty much everything I own uses the XH style connector. It’s not my favorite in the world but it is almost universal these days which is a nice change. I think Thunder Power is one of the few holdouts on this which I really don’t understand. At this point they need to just concede the point and move to the XH with everyone else.