A while back, my flying buddy Gary gave me a Balsa USA M-1 Bristol as a thank you for some work I had done on an airplane of his… or maybe it was a few airplanes… or a bunch! Anyway, we had both seen it at a swap meet and I had admired it but he bought it. I think it may have been traded off and then reacquired at some point before it found its way to me but in any case it has been sitting in a corner of the shop for a while now and I finally picked up what I think will be an appropriate power system for it, the E Flite Power 46 and a Castle Creations Talon 90 Speed Controller. The Talon is a bit of overkill but for some reason seems to always be available at a relatively lower price point in the Castle line (my favorites). It has an outstanding BEC capability and can handle up to 6S and 90A. Castle and E Flite are among my favorite brands.
The first task was to build up a good engine mount for an airplane that was kit built to mount a glow engine. To mount the motor out far enough to get the back plate beyond the cowl face means spacing out somewhere around 3″ to the back of the motor in this case. Nose weight is also not a consideration since the Bristol is so short nosed and more likely would need more weight up front if anything. Finding some 3″ spacers is difficult at best, and I like the idea of something more rigid anyway (long spacers tend to flex or twist a bit under load).
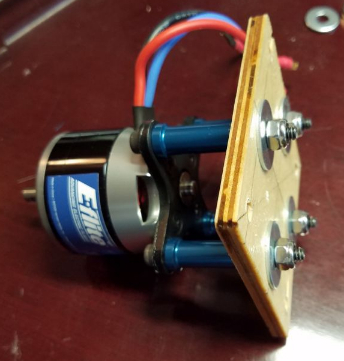
To accomplish this I decided on using some shorter spacers mounting to what I refer to as a sub-firewall and then more short spacers to the X mount on the back of the motor. This assembly is very strong and uses a few easier to find smaller spacers and some rigid plywood to put the motor out where it is needed. Here are some pics showing the assembly.
Motor attached to sub firewall
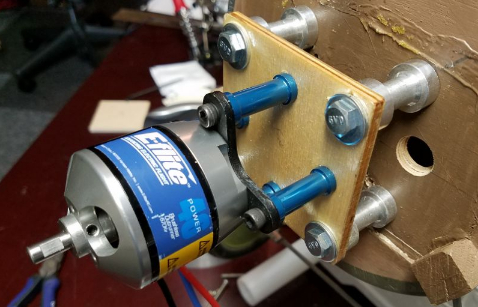
Sub firewall bolted to firewall
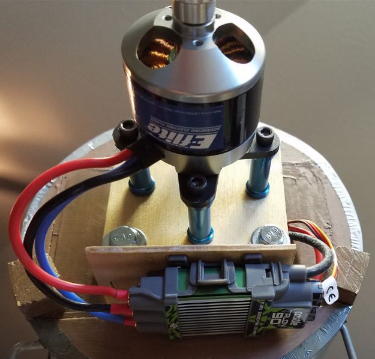
Mounting plate tie wrapped to spacers used to mount speed controller.
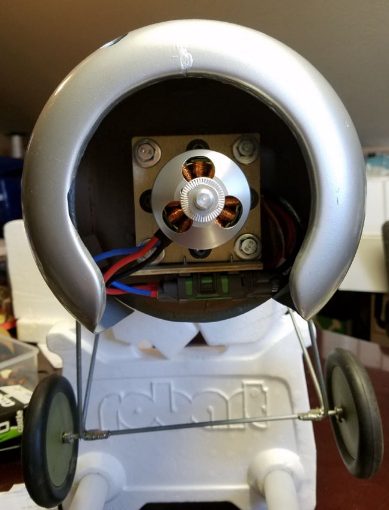
With the cowl in place
There are a few other necessary installation tasks… servos to be mounted, an arming switch to mount, and making sure the battery can be located in a spot where the plane will balance… but progress is being made. Looking forward to flying.
2 Replies to “Balsa USA Bristol M-1 Part 1: Motor mounting”
Hi I have a kit for this model, where are you going to the battery and how to change it, Please.
Big Al
I created a battery holder inside, just behind the firewall that was only accessible by removing the wing. It slanted down and forward to make an easy “drop in” compartment that kept the weight forward where it was needed and the wing had a nice foam block attached that acted to hold the battery firmly inside the “box”. Since I didn’t have any of the flying wires, taking the wing on and off was no big deal and my Maxx Products battery arming switch was accessible from outside so I could insert the battery and leave it plugged in without worrying about draining it. Plug in the arming plug, fly and pull it. Then take the wing off and replace the battery at my leisure. I had pretty well decided to add the flying wires using some stretchable type cording for easy removal (those on the bottom that need to be removed to get the wing off) when I made the decision to move on to another plane.
The Bristol got to be an adequate flyer before I got rid of it but I just can’t seem to get excited about flying a WWI bird. They are just not my cup of tea (sad to say about a British airplane). I’ve never been that enamored of spending the time to really detail a plane out for a beautiful scale look and the flying characteristics for WWI planes are nothing to write home about so while I enjoy seeing them flown and built out to museum quality, it’s not for me. I was also getting to my personal breaking point on the number of planes I own (storage was getting to be a problem) so when I fell in love with another plane that that I could move that power system too… it was bye bye to the Bristol. Even better, a fellow club member bought it and did a nice recover job on it so I will get to watch it fly again! Good luck with yours!

Hi I have a kit for this model, where are you going to the battery and how to change it, Please.
Big Al
Hey Al,
I created a battery holder inside, just behind the firewall that was only accessible by removing the wing. It slanted down and forward to make an easy “drop in” compartment that kept the weight forward where it was needed and the wing had a nice foam block attached that acted to hold the battery firmly inside the “box”. Since I didn’t have any of the flying wires, taking the wing on and off was no big deal and my Maxx Products battery arming switch was accessible from outside so I could insert the battery and leave it plugged in without worrying about draining it. Plug in the arming plug, fly and pull it. Then take the wing off and replace the battery at my leisure. I had pretty well decided to add the flying wires using some stretchable type cording for easy removal (those on the bottom that need to be removed to get the wing off) when I made the decision to move on to another plane.
The Bristol got to be an adequate flyer before I got rid of it but I just can’t seem to get excited about flying a WWI bird. They are just not my cup of tea (sad to say about a British airplane). I’ve never been that enamored of spending the time to really detail a plane out for a beautiful scale look and the flying characteristics for WWI planes are nothing to write home about so while I enjoy seeing them flown and built out to museum quality, it’s not for me. I was also getting to my personal breaking point on the number of planes I own (storage was getting to be a problem) so when I fell in love with another plane that that I could move that power system too… it was bye bye to the Bristol. Even better, a fellow club member bought it and did a nice recover job on it so I will get to watch it fly again! Good luck with yours!